
The Madison Club · La Quinta, California
A new shape. A smarter way to rebuild.
Reshaping an existing pool at The Madison Club, La Quinta
Our customer loved the setting at The Madison Club in La Quinta, but hated the shape of the pool. New plaster and different tile would not solve that problem. The request was clear: turn the existing pool into a modern transitional rectangular pool that felt right for the home.
The finished transformation
The pool they wanted.
The setting they loved.
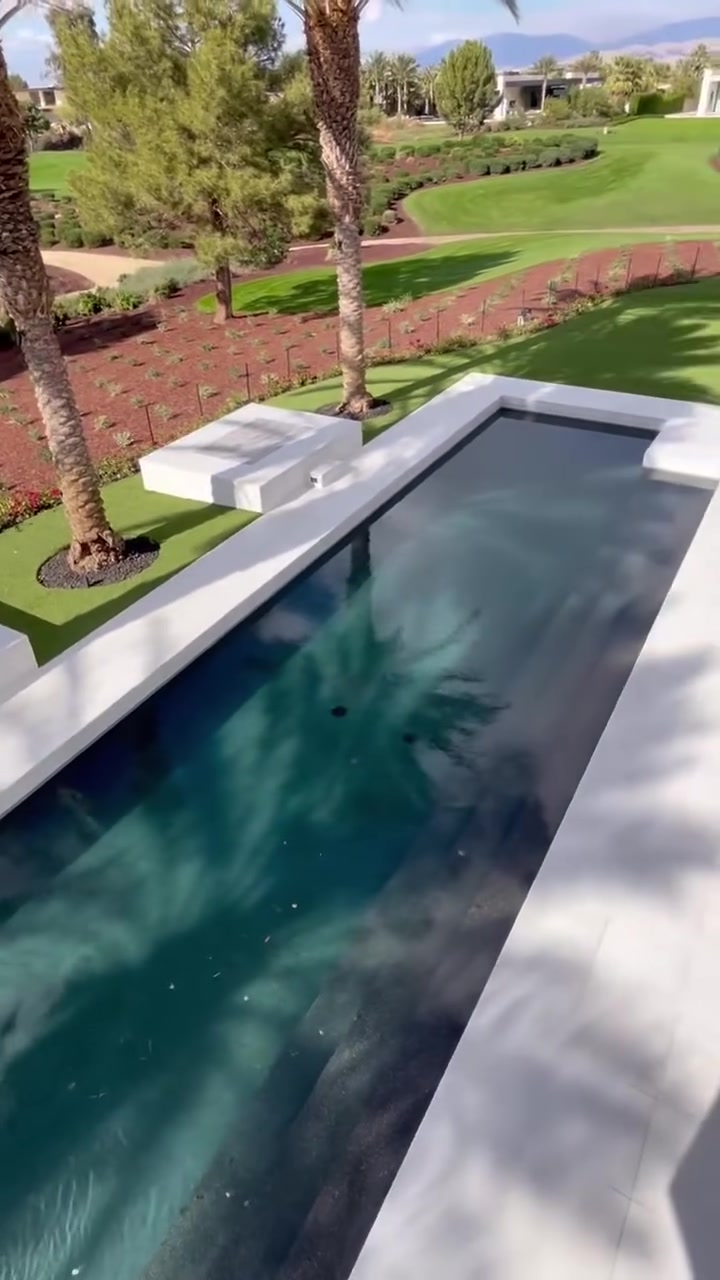
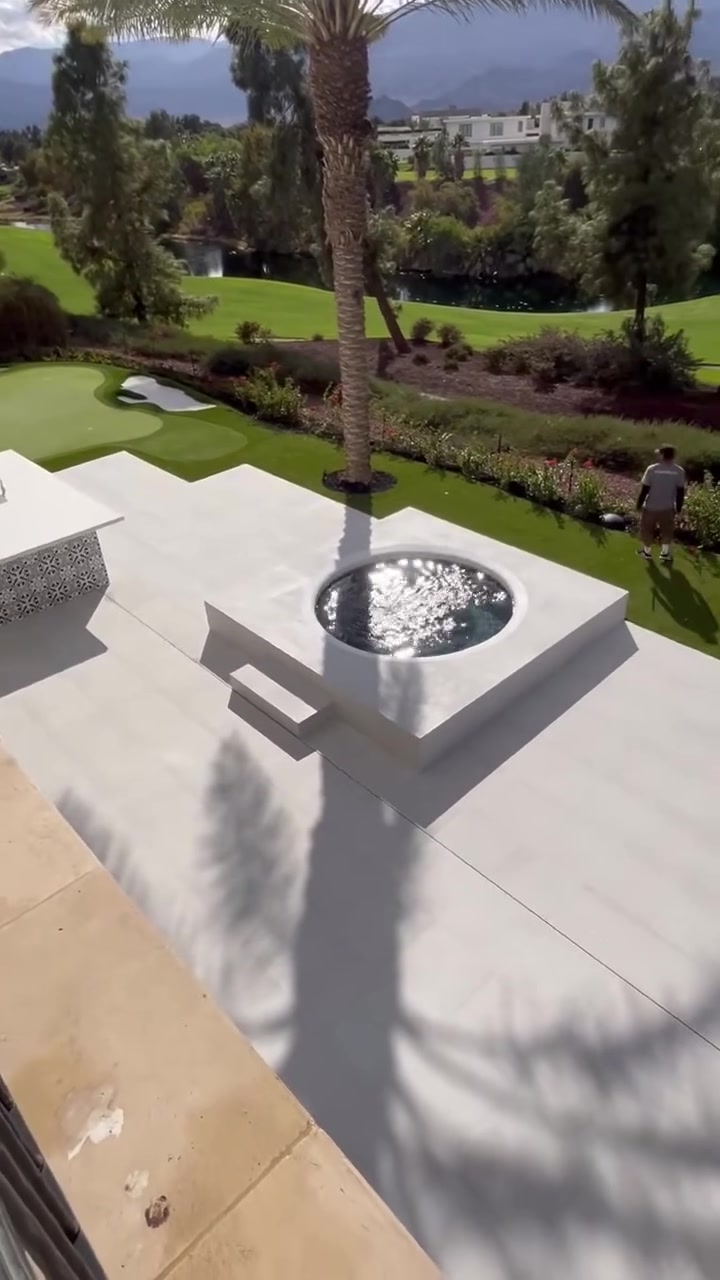
A modern transitional rectangle, a squared spa surround and a coordinated tile deck—all shaped around useful parts of the existing pool.
AFTER — COMPLETED POOL
AFTER — COMPLETED SPA
The starting point
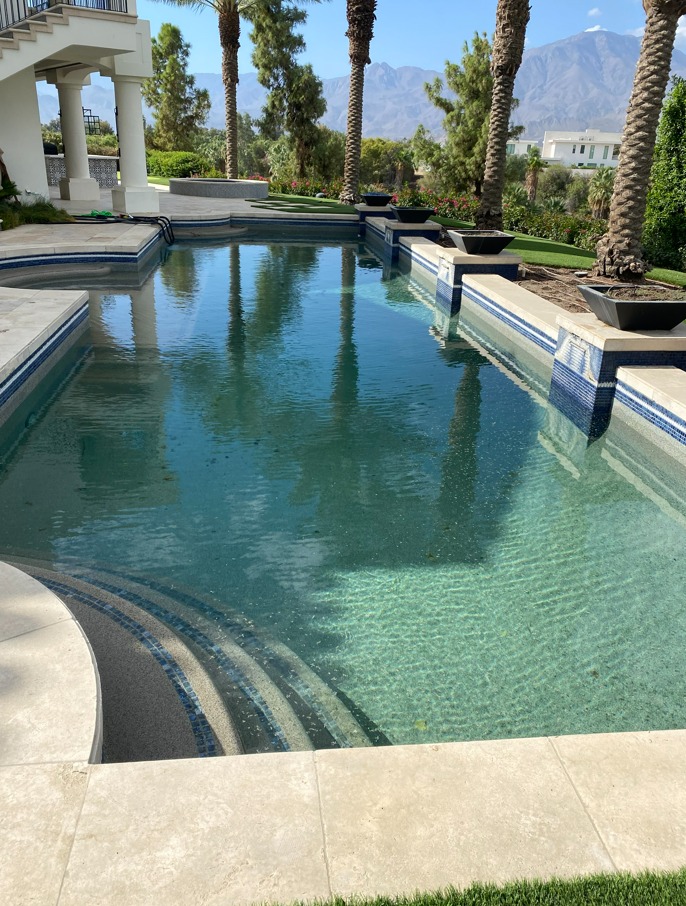
Before the renovation.
BEFORE — ORIGINAL POOL
BEFORE — ORIGINAL SPA
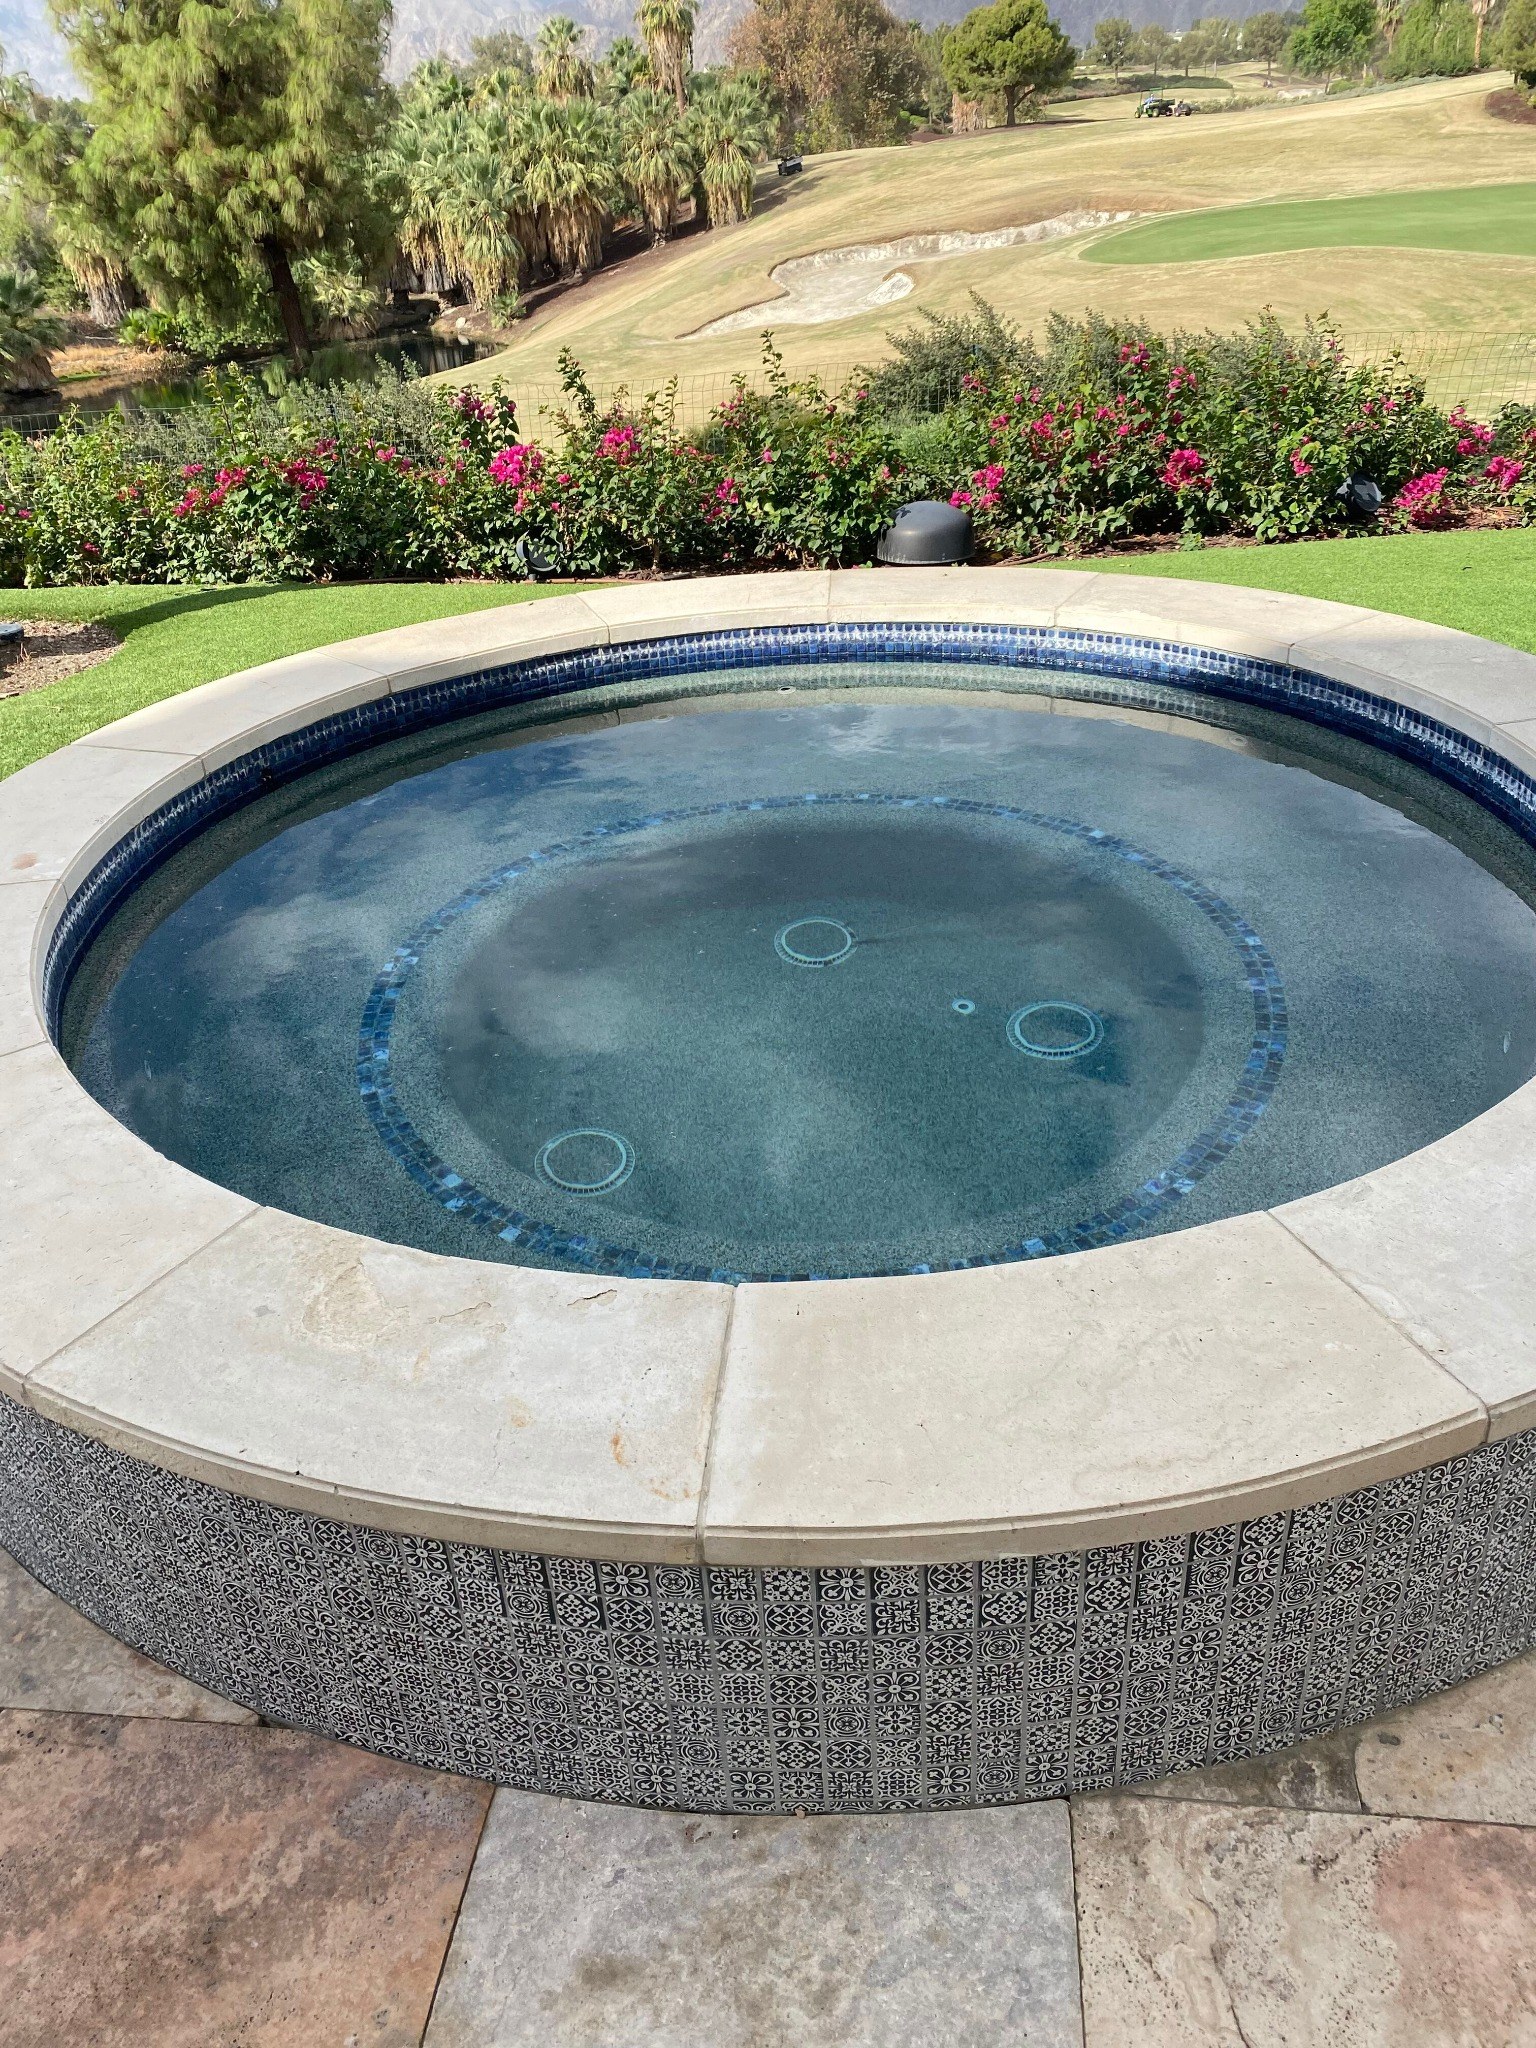
The BEFORE pool photo shows curved entry steps in the foreground and offsets along the pool edge. Beside it, the original spa has a circular surround with curved coping. Our customer wanted a cleaner rectangular pool composition, straight steps and coordinated finishes.
The design challenge
The setting was right.
The shape needed to change.
The pool belonged in this setting. Its shape did not. The owner wanted the calm, straight lines of a modern transitional rectangle, with a spa and deck that felt designed together. That meant looking beyond new plaster and tile to the structure beneath them.
Our approach was selective reconstruction: retain suitable parts of the shell and infrastructure, rebuild the geometry, and coordinate the finishes from the beginning. The pool edge, entry steps, spa surround and raised seating would all follow the same design language.
Preserve the value already in the ground
Why start over with everything?
A pool's value is not limited to what you see above the waterline. There is an excavated basin, a substantial concrete shell, underground plumbing and electrical infrastructure. If those elements are suitable for the proposed renovation, discarding them all can mean paying to remove useful work and then paying again to replace it.
Keep useful concrete
Retaining sound portions of the existing shell can reduce concrete demolition, debris hauling, excavation and replacement construction.
Retain suitable plumbing
Existing lines can remain where their condition, routing and capacity suit the new design. Pressure testing helps identify leaks before surrounding work conceals them.
Reuse appropriate infrastructure
Suitable electrical routes and other infrastructure may remain after evaluation, while outdated lighting and components that do not meet the new requirements are upgraded.
Spend on the transformation
The investment can focus on the changes the owner actually wants: a different shape, better proportions, updated lighting, coordinated finishes and a more useful outdoor space.
Selective reconstruction can cost less than a complete tear-out when enough of the existing pool is reusable. The comparison depends on shell condition, the extent of the changes, access, engineering and required upgrades. It is a project-specific decision, not a fixed percentage discount.
From demolition to finish work
The transformation, layer by layer.
The story moves from selective reconstruction to straight steps, waterproofed details and a carefully aligned tile finish. These are the decisions that turned the owner’s brief into the completed pool above.
Resolve the new shape before the first cut
A successful shape change begins with a measured plan: the desired length, width, depth, steps and spa, checked against the existing shell, site access and surrounding elevations. The tile size belongs in that conversation early. A full-piece perimeter is much easier to achieve when the finished pool dimensions are planned around it.
For a renovation of this kind, the scope must also establish what can be reused, what needs engineering, how circulation and equipment will serve the revised pool, and which permits and HOA approvals apply. Required inspections belong in the sequence before work is covered. These decisions turn a desired outline into a buildable project.
Open only what the new design needs
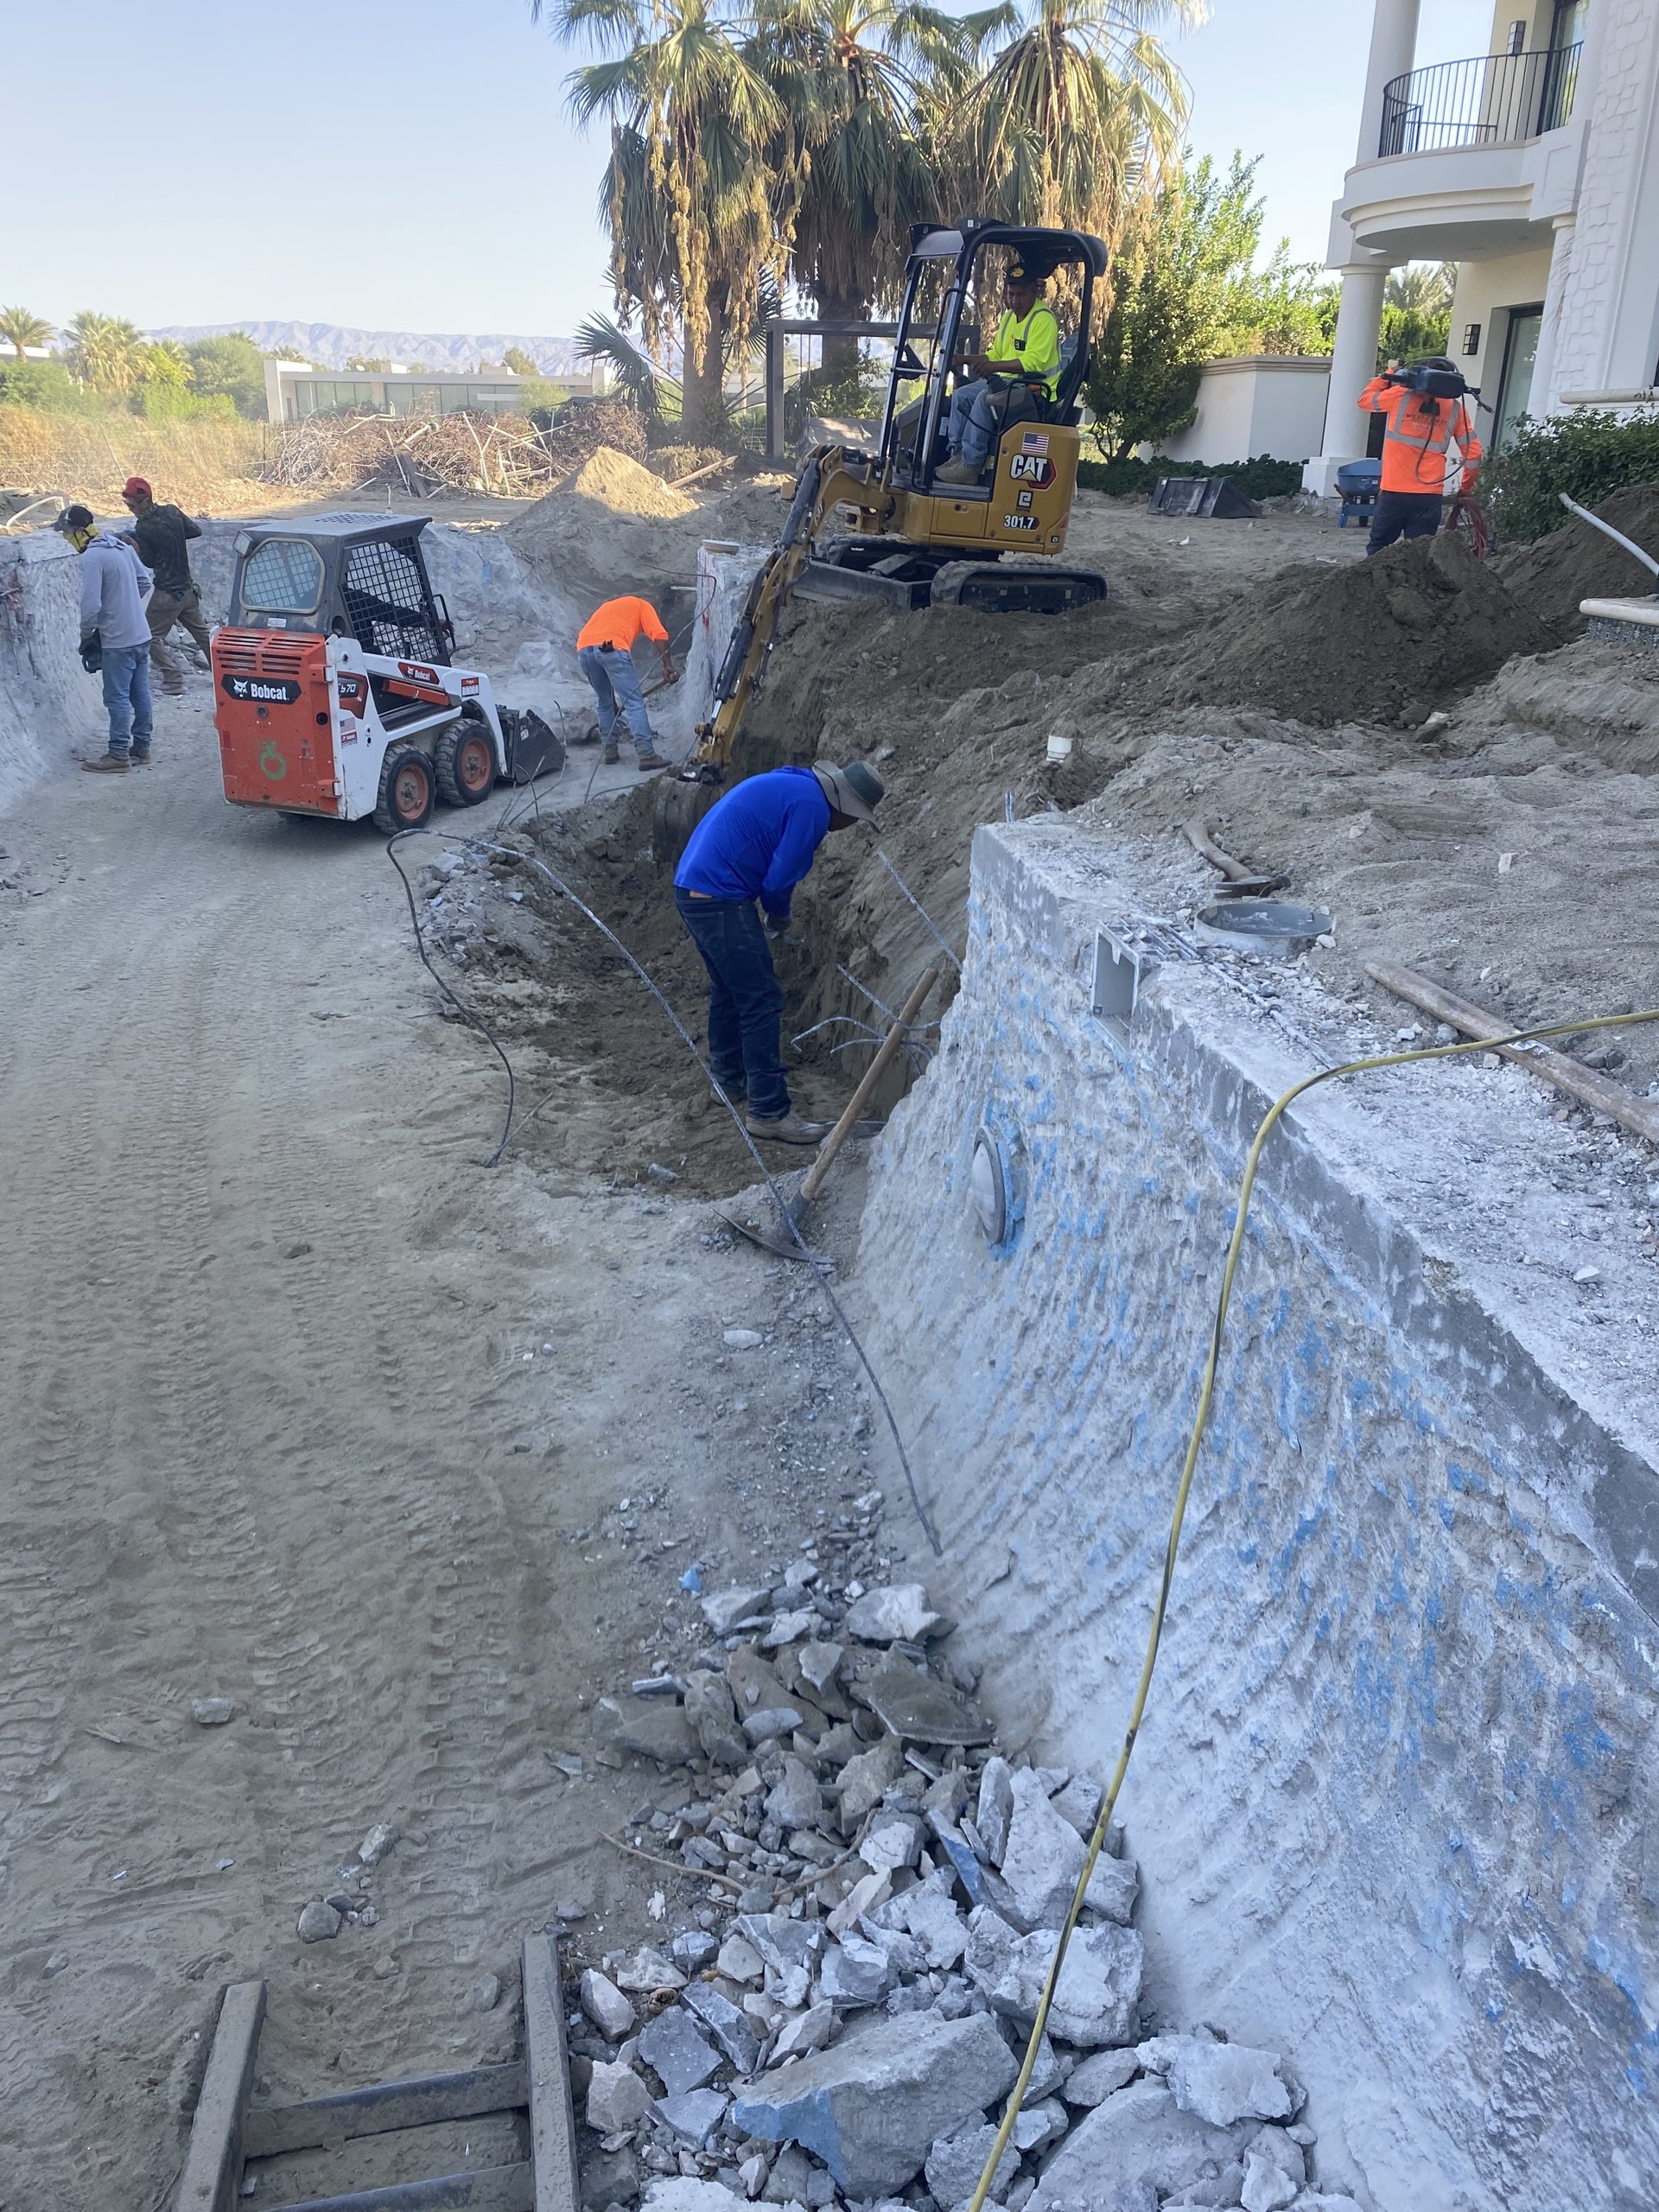
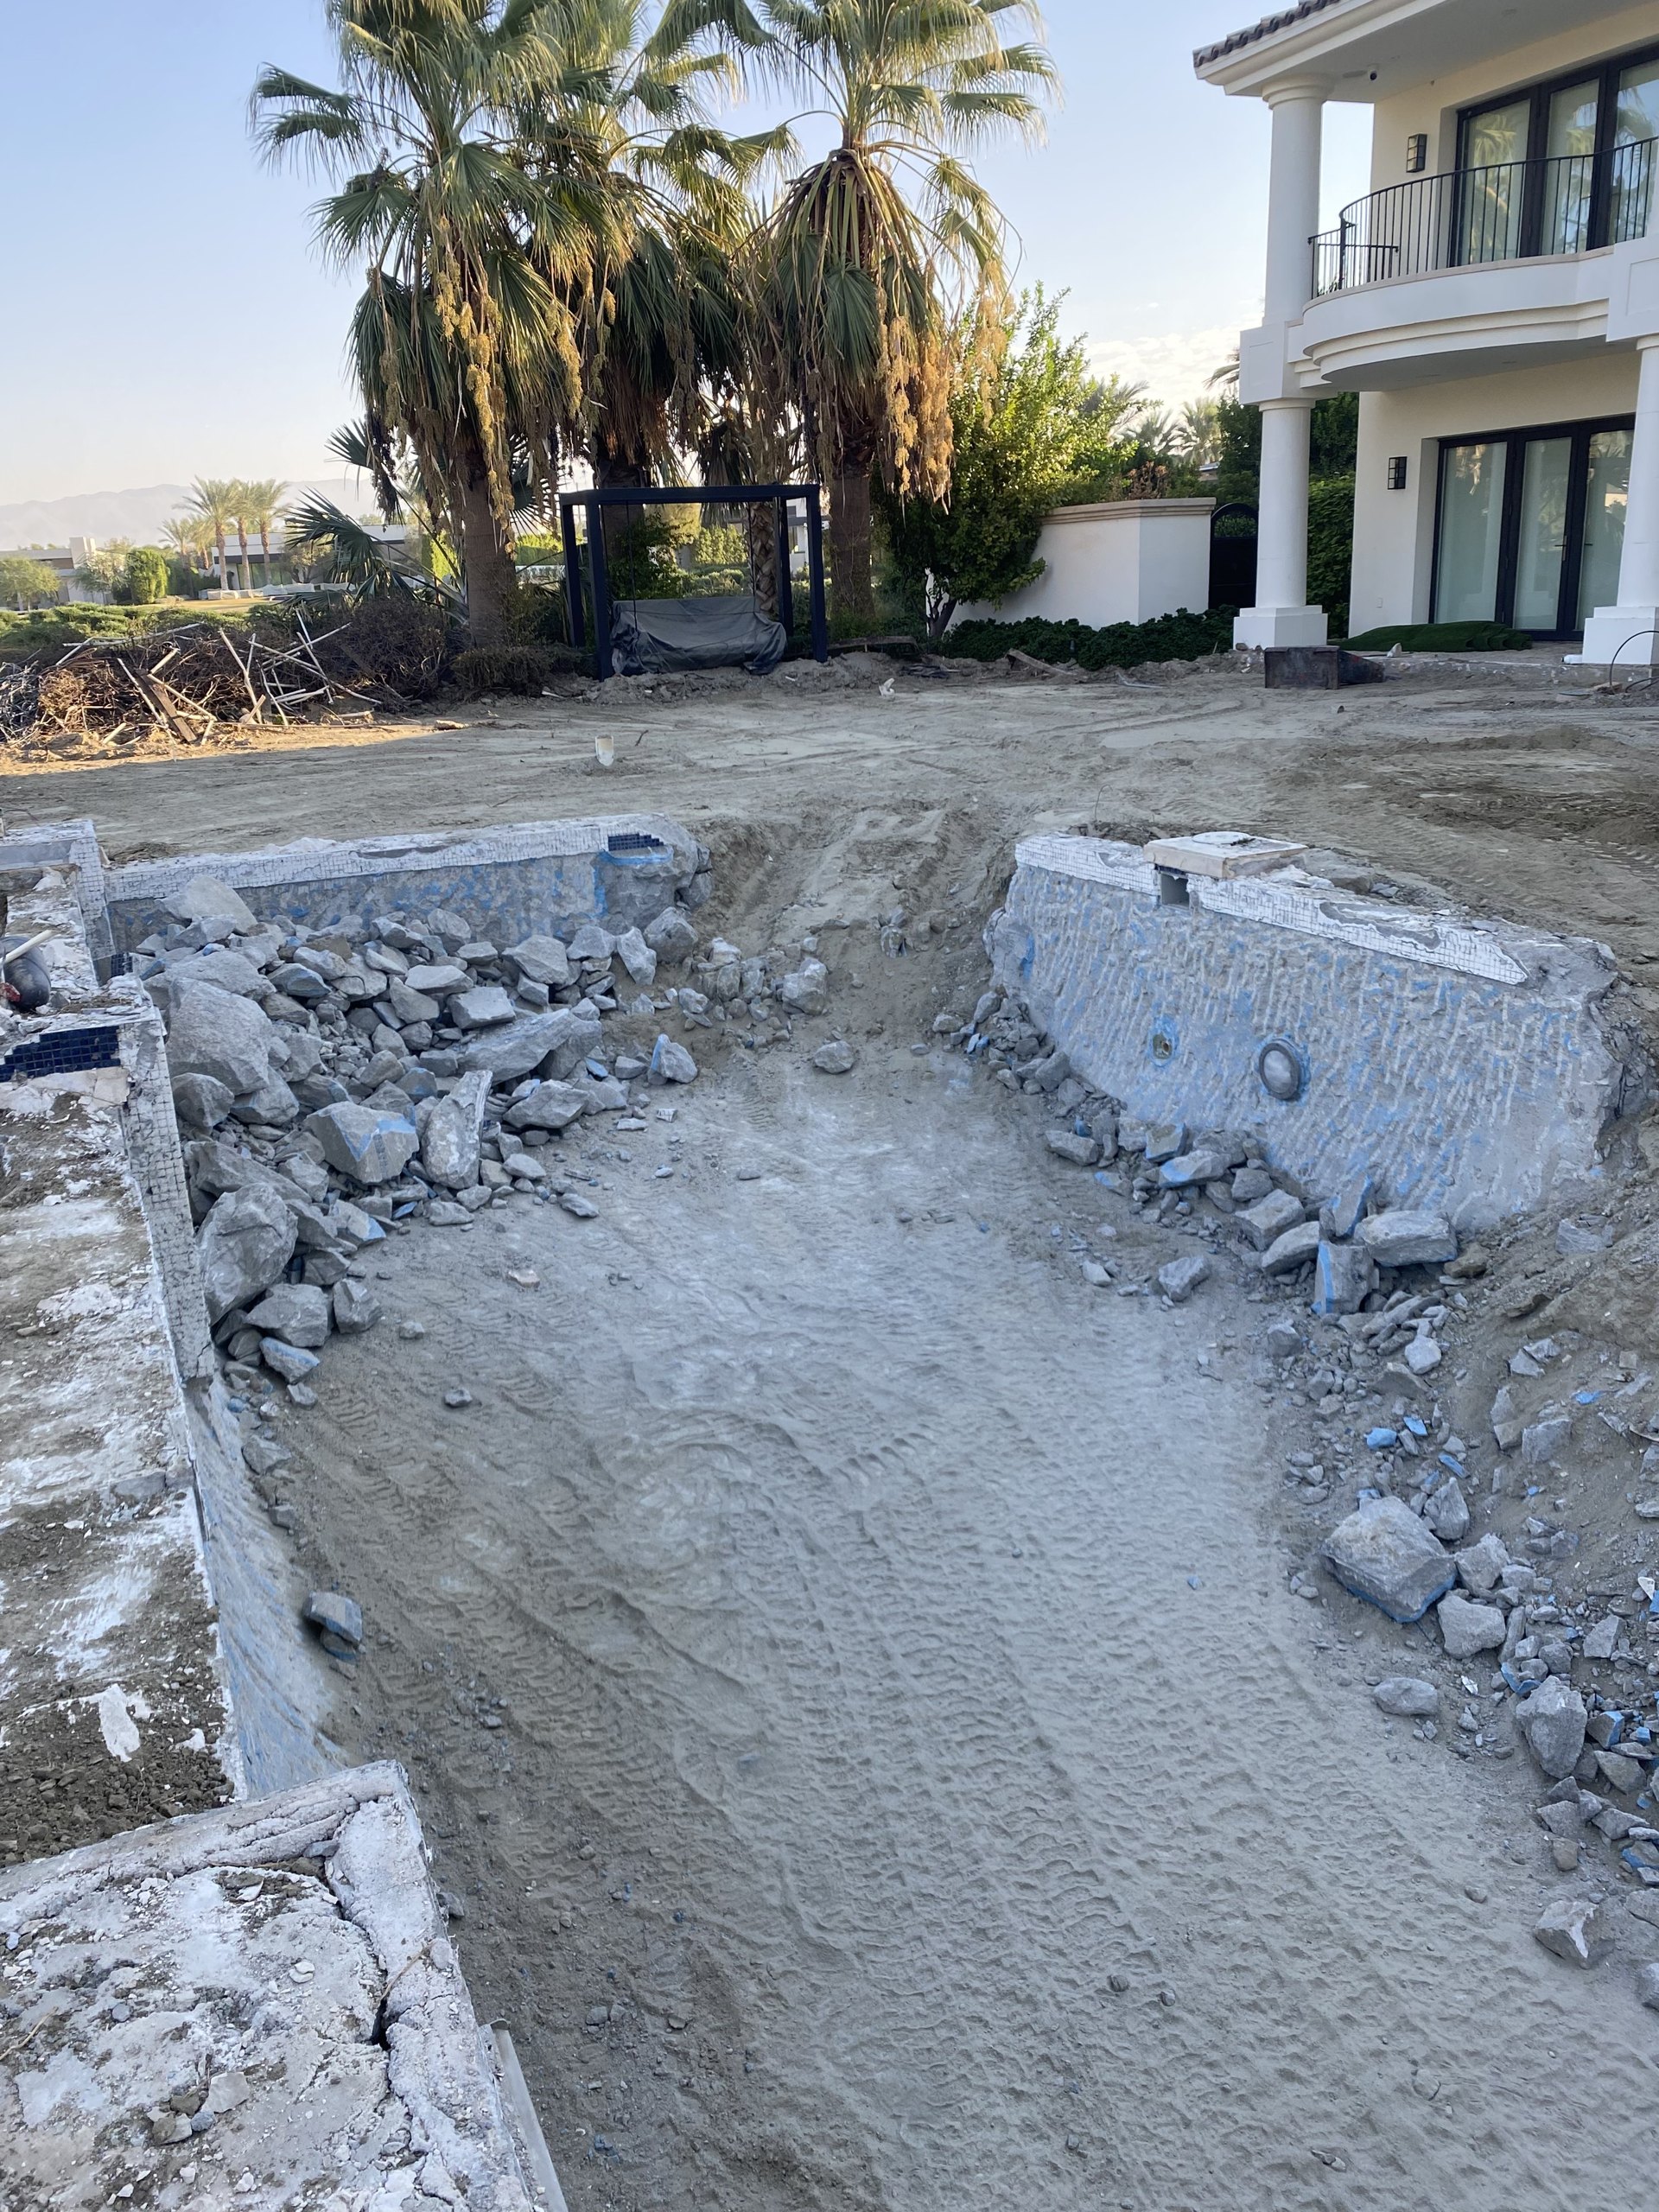
We removed the affected decking and the portions of the pool that conflicted with the new rectangle. Grading established working levels for the pool, deck and transitions to the house. Substantial areas of the existing shell remained.
The important part of these photographs is what stayed. Suitable concrete and infrastructure gave the renovation a starting point, reducing the amount of demolition, hauling and replacement work compared with rebuilding every component.
Selective demolition
Open the pool. Keep what can serve the new design.
Full clip · 8 seconds
A full sweep of the opened pool shows removed concrete, rubble and equipment working inside the retained basin.
What this video shows
The camera pans across broken concrete and the retained pool edge, passes the house and a compact loader inside the basin, and finishes along the opened pool perimeter. This is the demolition stage, before the new shell geometry is built.
Form the geometry and connect the reinforcing steel
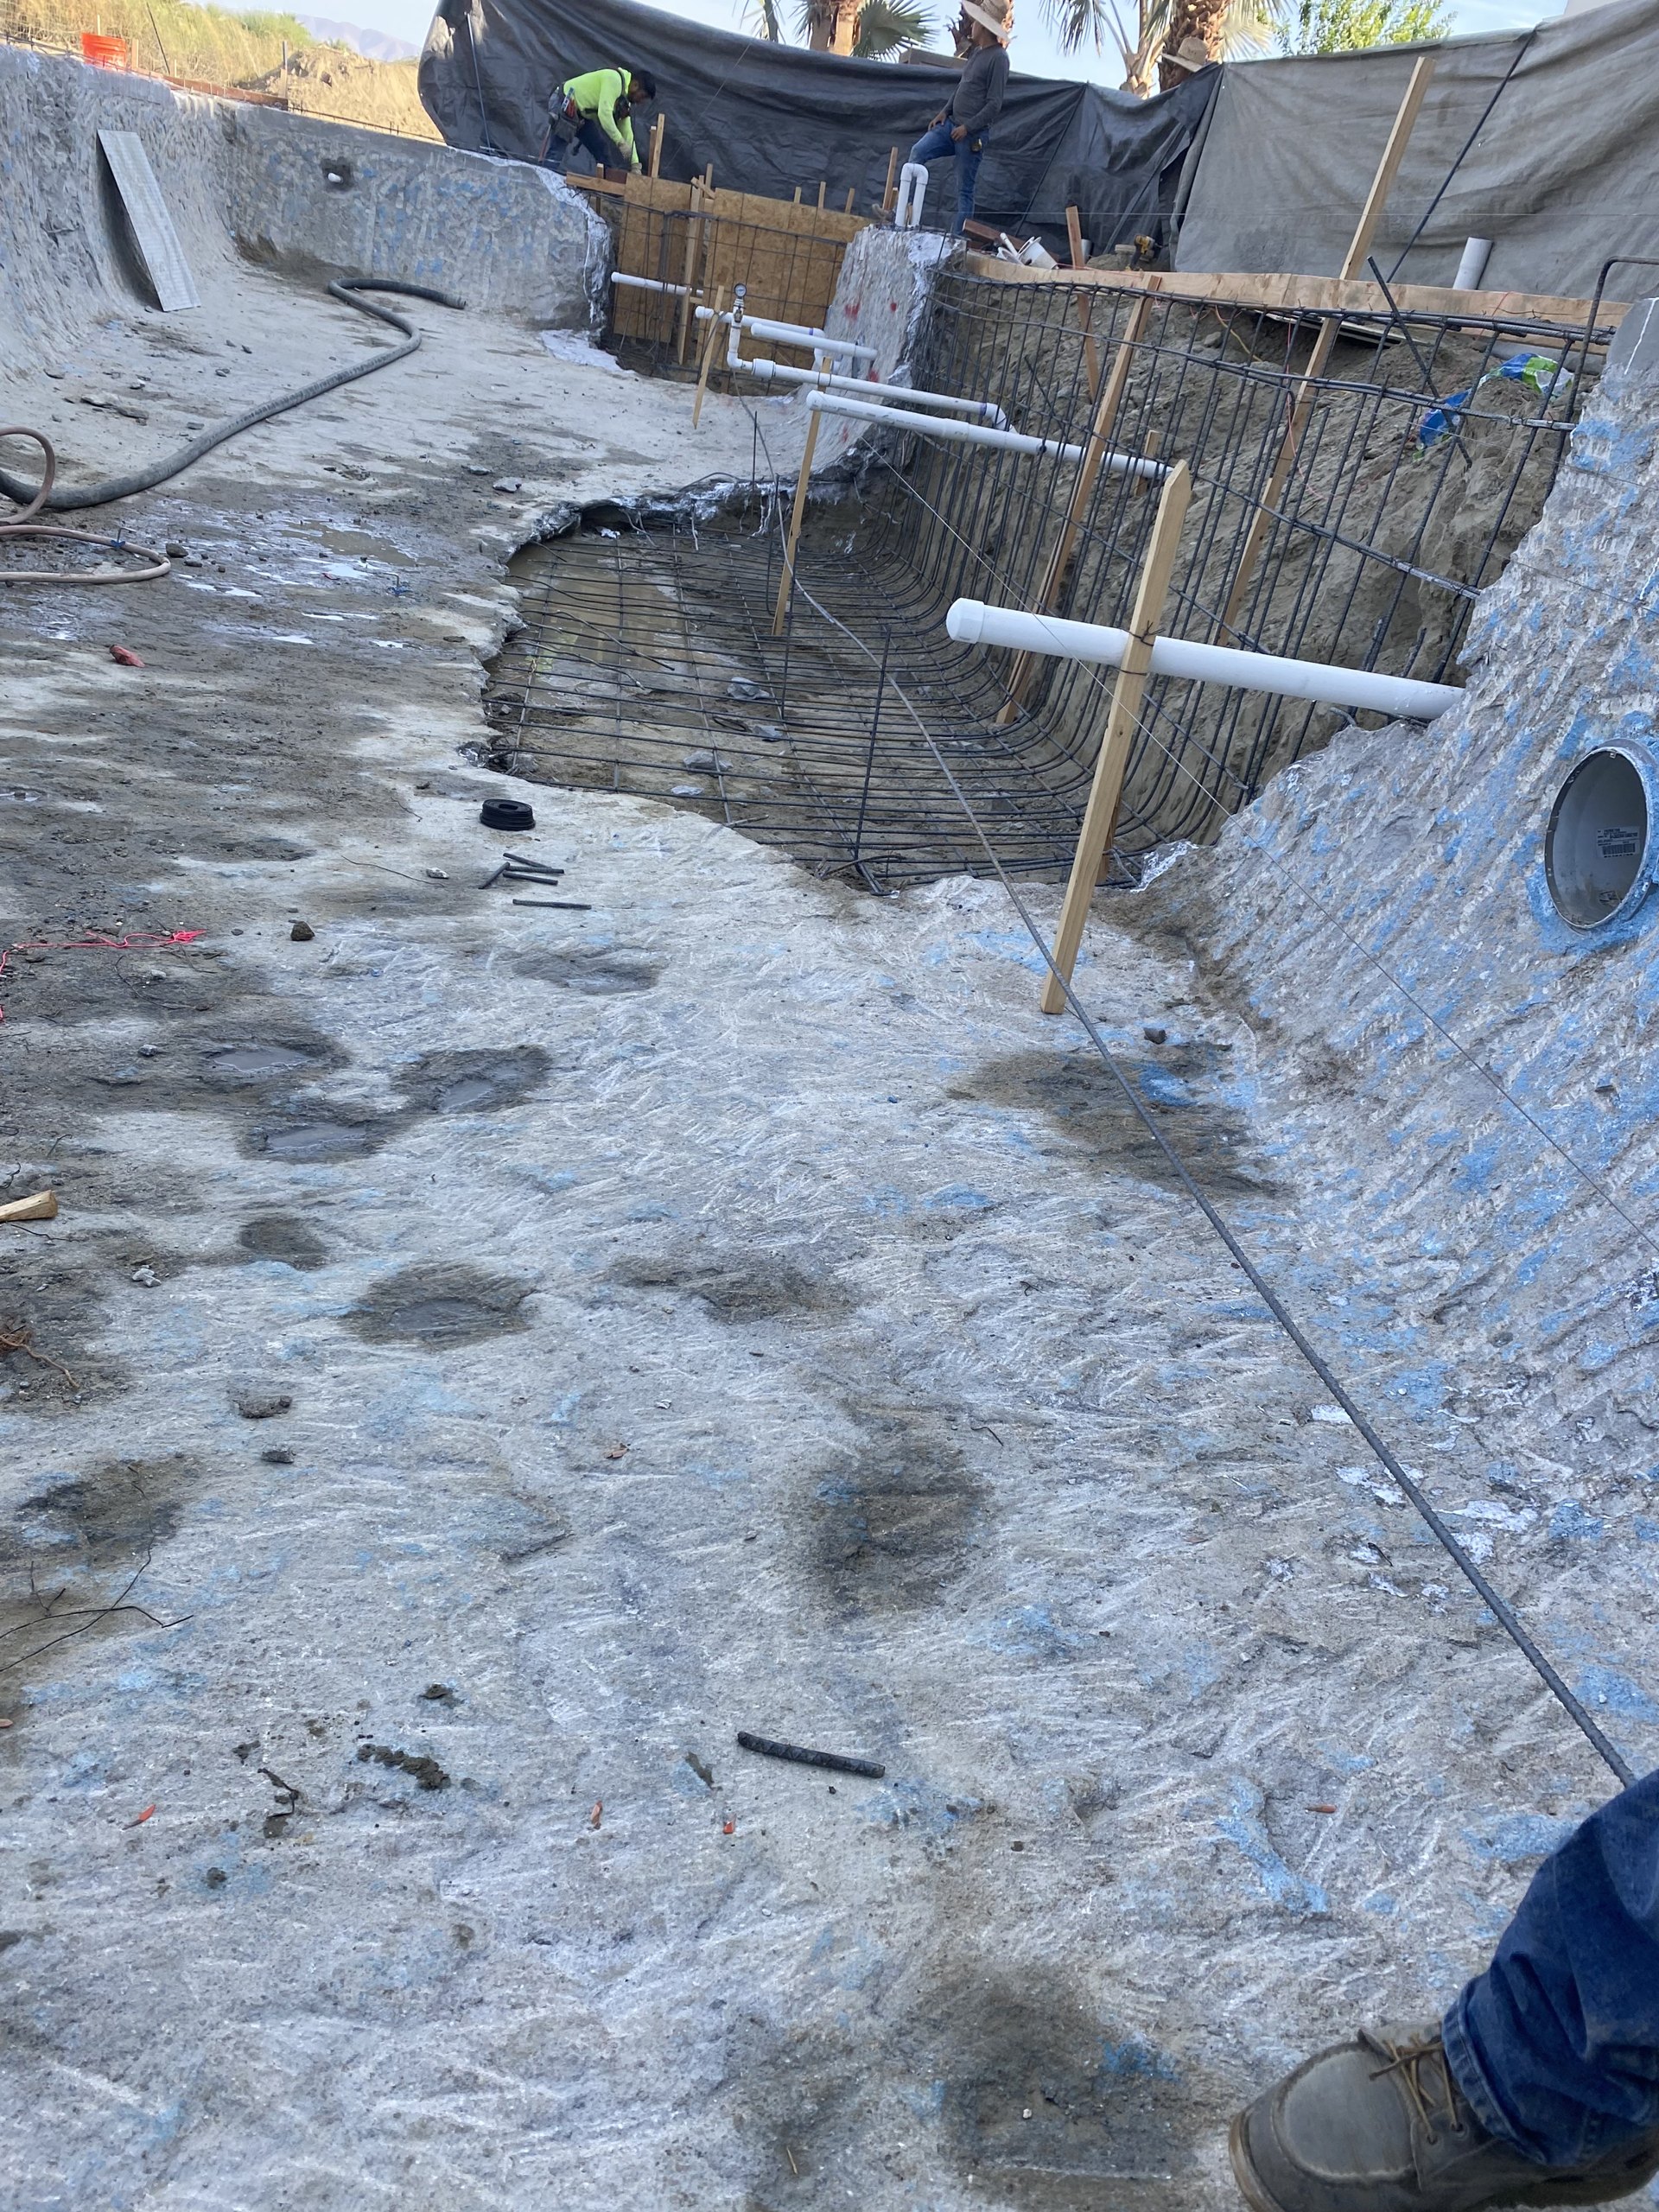
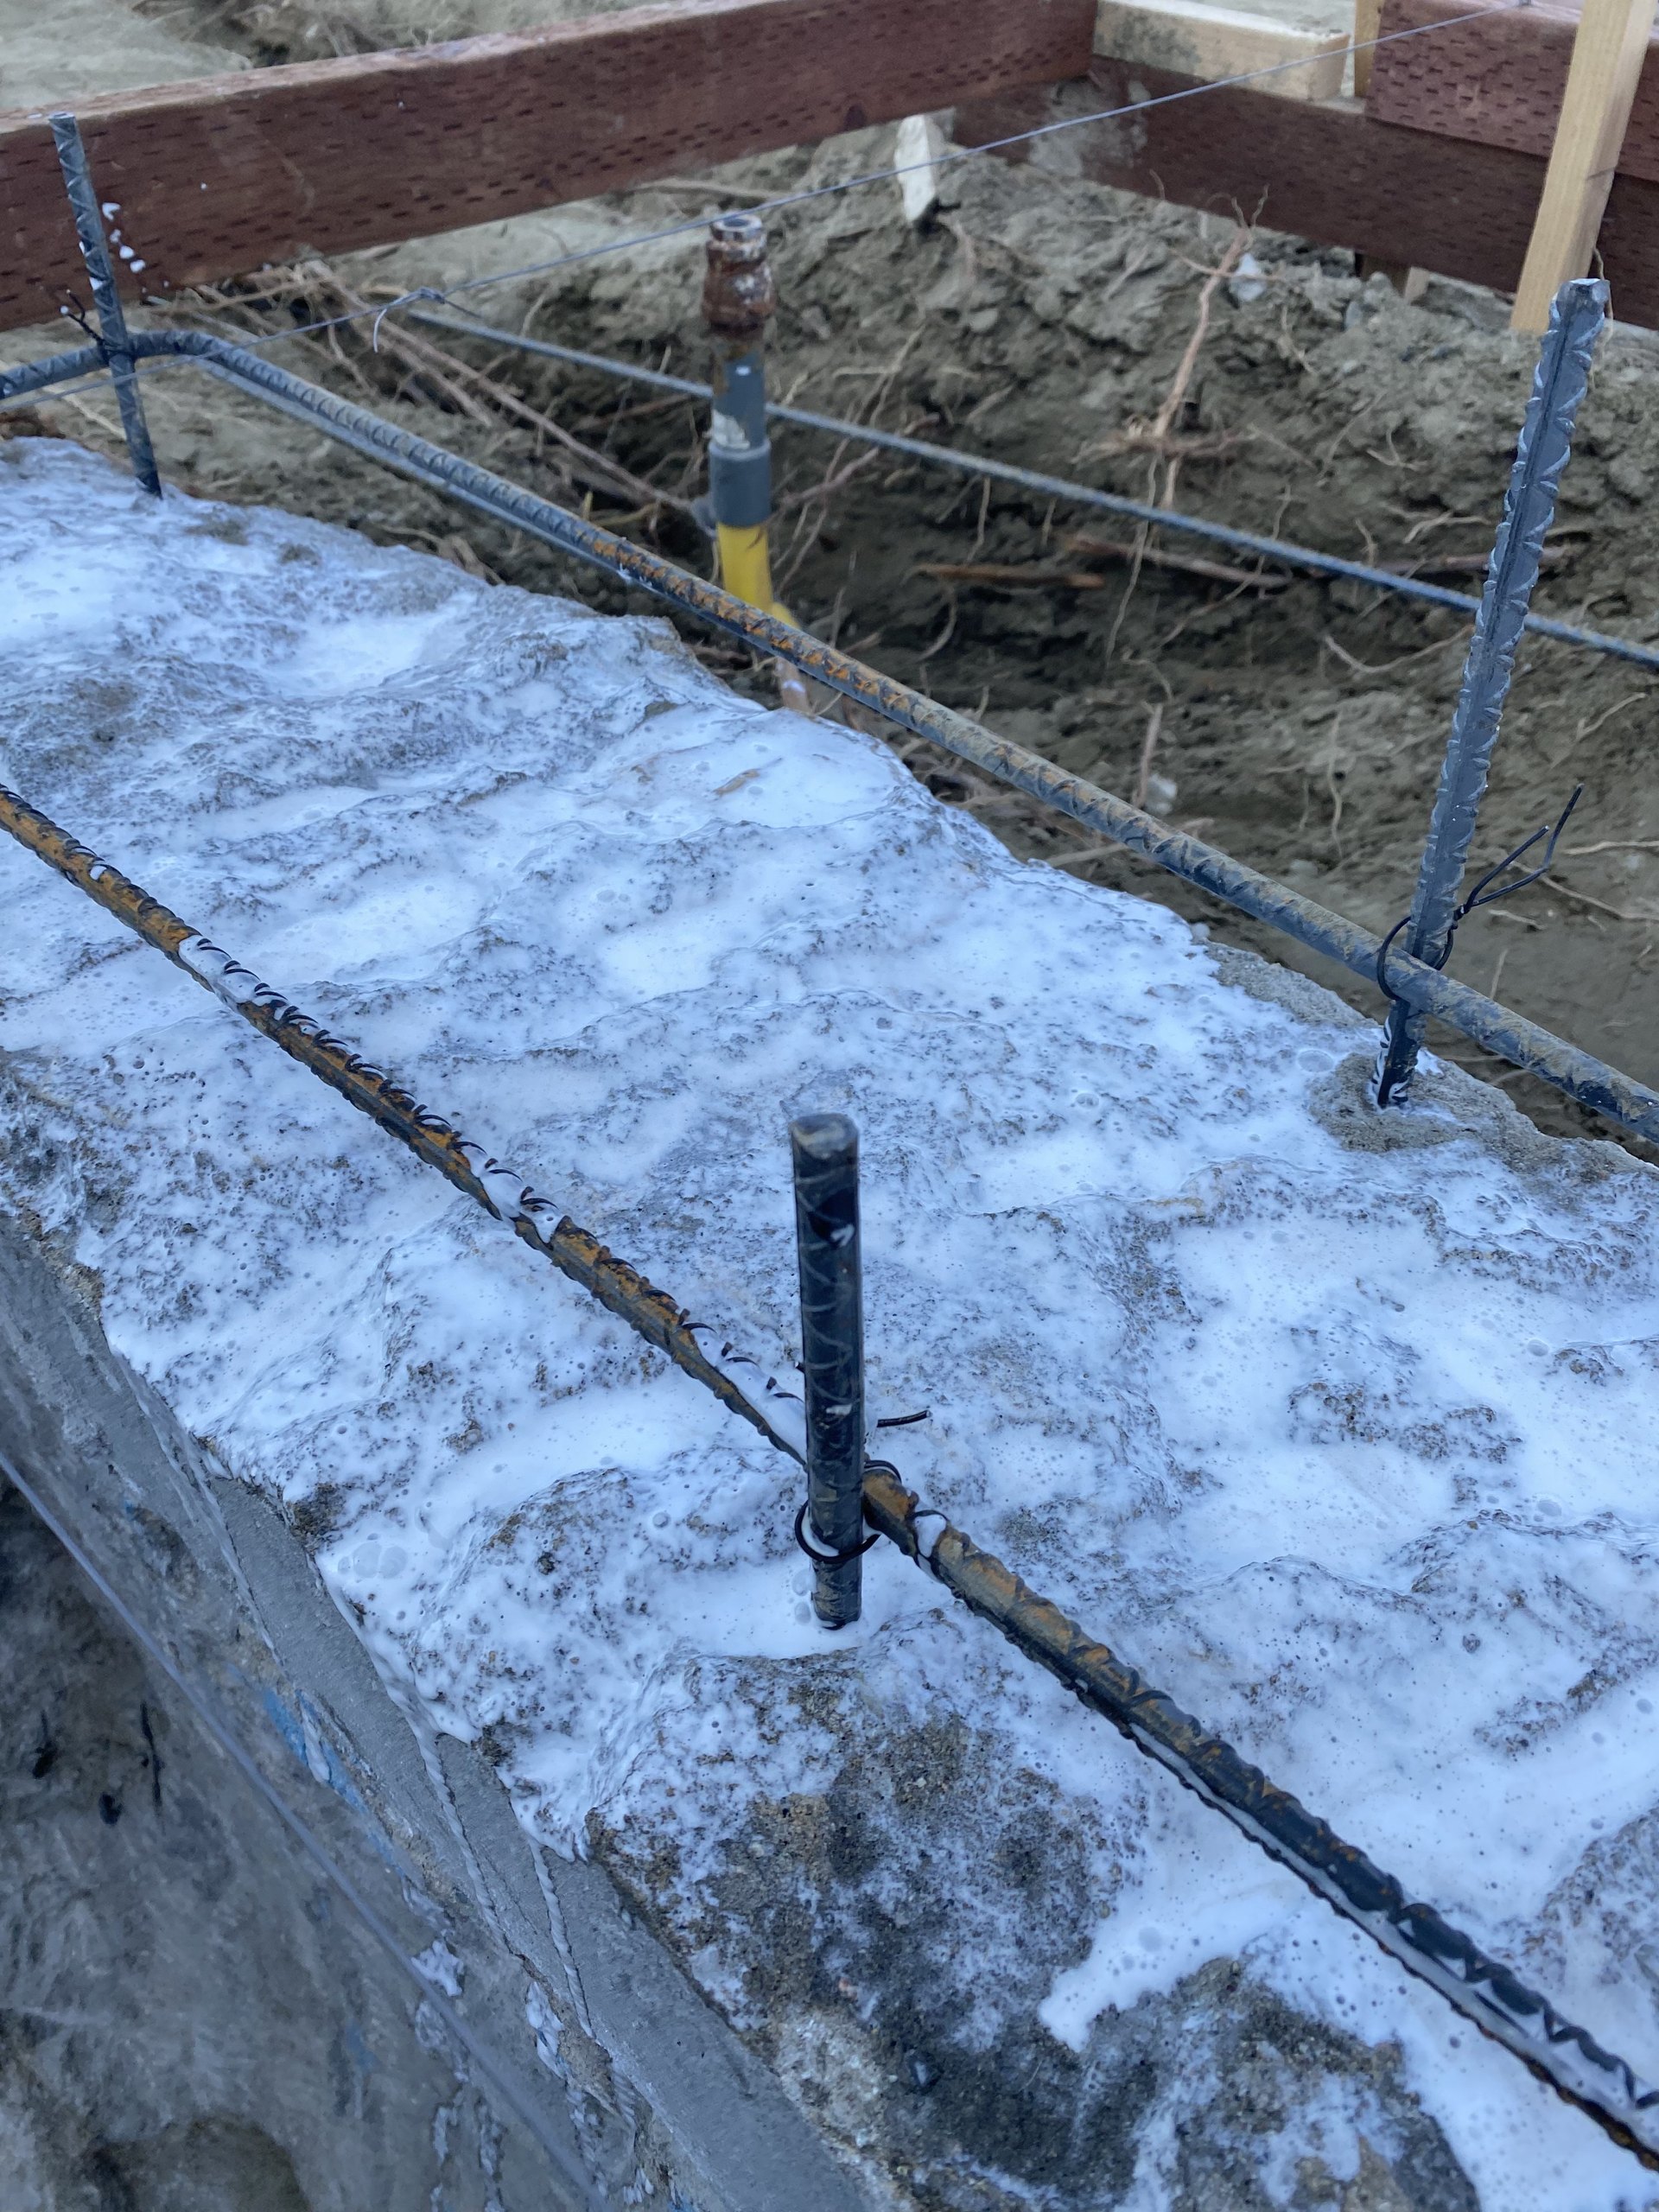
Formwork established the straight edges. We drilled into the retained concrete and used structural epoxy to anchor reinforcing dowels, connecting the new rebar to the existing shell at the reconstruction areas. The shape was becoming visible, but the connection between old and new mattered just as much.
A reliable bond also depends on preparing sound existing concrete: removing weak material, roughening and cleaning the surface, and achieving the specified moisture condition. Where a bonding agent is specified for a compatible repair detail, its purpose is adhesion at that interface; it does not replace reinforcing steel or surface preparation. It is not a routine requirement for shotcrete, whose placement and substrate preparation must follow the engineered detail and applicable shotcrete guidance.
Reinforcing, anchorage, cover and embedded systems need their required checks before shotcrete conceals them.
Test what stays. Upgrade what needs to change.
We pumped up the existing plumbing for pressure testing to check for leaks while the work was open. Retaining a pipe is valuable only when its condition and the revised pool design justify it. Changes to pool size or depth also call for a review of circulation, suction outlets and equipment capacity—not just a leak test.
The renovation included replacing the old 110-volt pool lighting with modern low-voltage LEDs. The supporting electrical work must address pool-rated equipment, the correct power supply, bonding, grounding and circuit protection. Coordinating these systems before closing the shell avoids disturbing the finished work later.
Replace the curves with straight walls and linear steps
Shotcrete gave the new geometry substance. Straight walls and broad, linear entry steps took shape around the reinforcing steel, while the spa gained a squared exterior around its retained circular bathing interior. This is the turning point: the owner’s requested rectangle becomes a physical space.
Placement is followed by curing, not an immediate rush into finishes. Maintaining the specified moisture and protection helps the new concrete develop strength and a durable surface. The curing period and readiness for coatings must follow the project specifications and the finish system.
Shotcrete application
Building the straight walls
Full clip · 31 seconds
The crew applies shotcrete and works the new pool walls into the planned geometry.
What this video shows
The clip opens on freshly placed concrete and crew members shaping the pool edge. The camera follows the long pool wall, then shows a nozzle operator applying shotcrete while another worker shapes the concrete above. It continues past projecting details and returns to the crew.
Linear steps
The curved entry becomes straight
Full clip · 10 seconds
Long, straight steps are visible in the new shotcrete as the crew continues shaping the surrounding work.
What this video shows
The camera begins with the broad, newly formed straight steps, pans along the pool as the crew works below them, then returns to the steps and their square end detail. Hoses, wet concrete and ongoing finishing work show that this is structural construction rather than the finished pool.
Spa reconstruction
A square surround. A retained circular interior.
Full clip · 12 seconds
The new square exterior takes shape around the existing circular spa interior.
What this video shows
The camera moves around the spa after the new exterior concrete has been placed. Its straight outer faces and square corners contrast with the retained round bathing interior. A crew member works nearby, and the surrounding yard is still under construction.
The entry, reimagined
From curved steps to clean, linear geometry
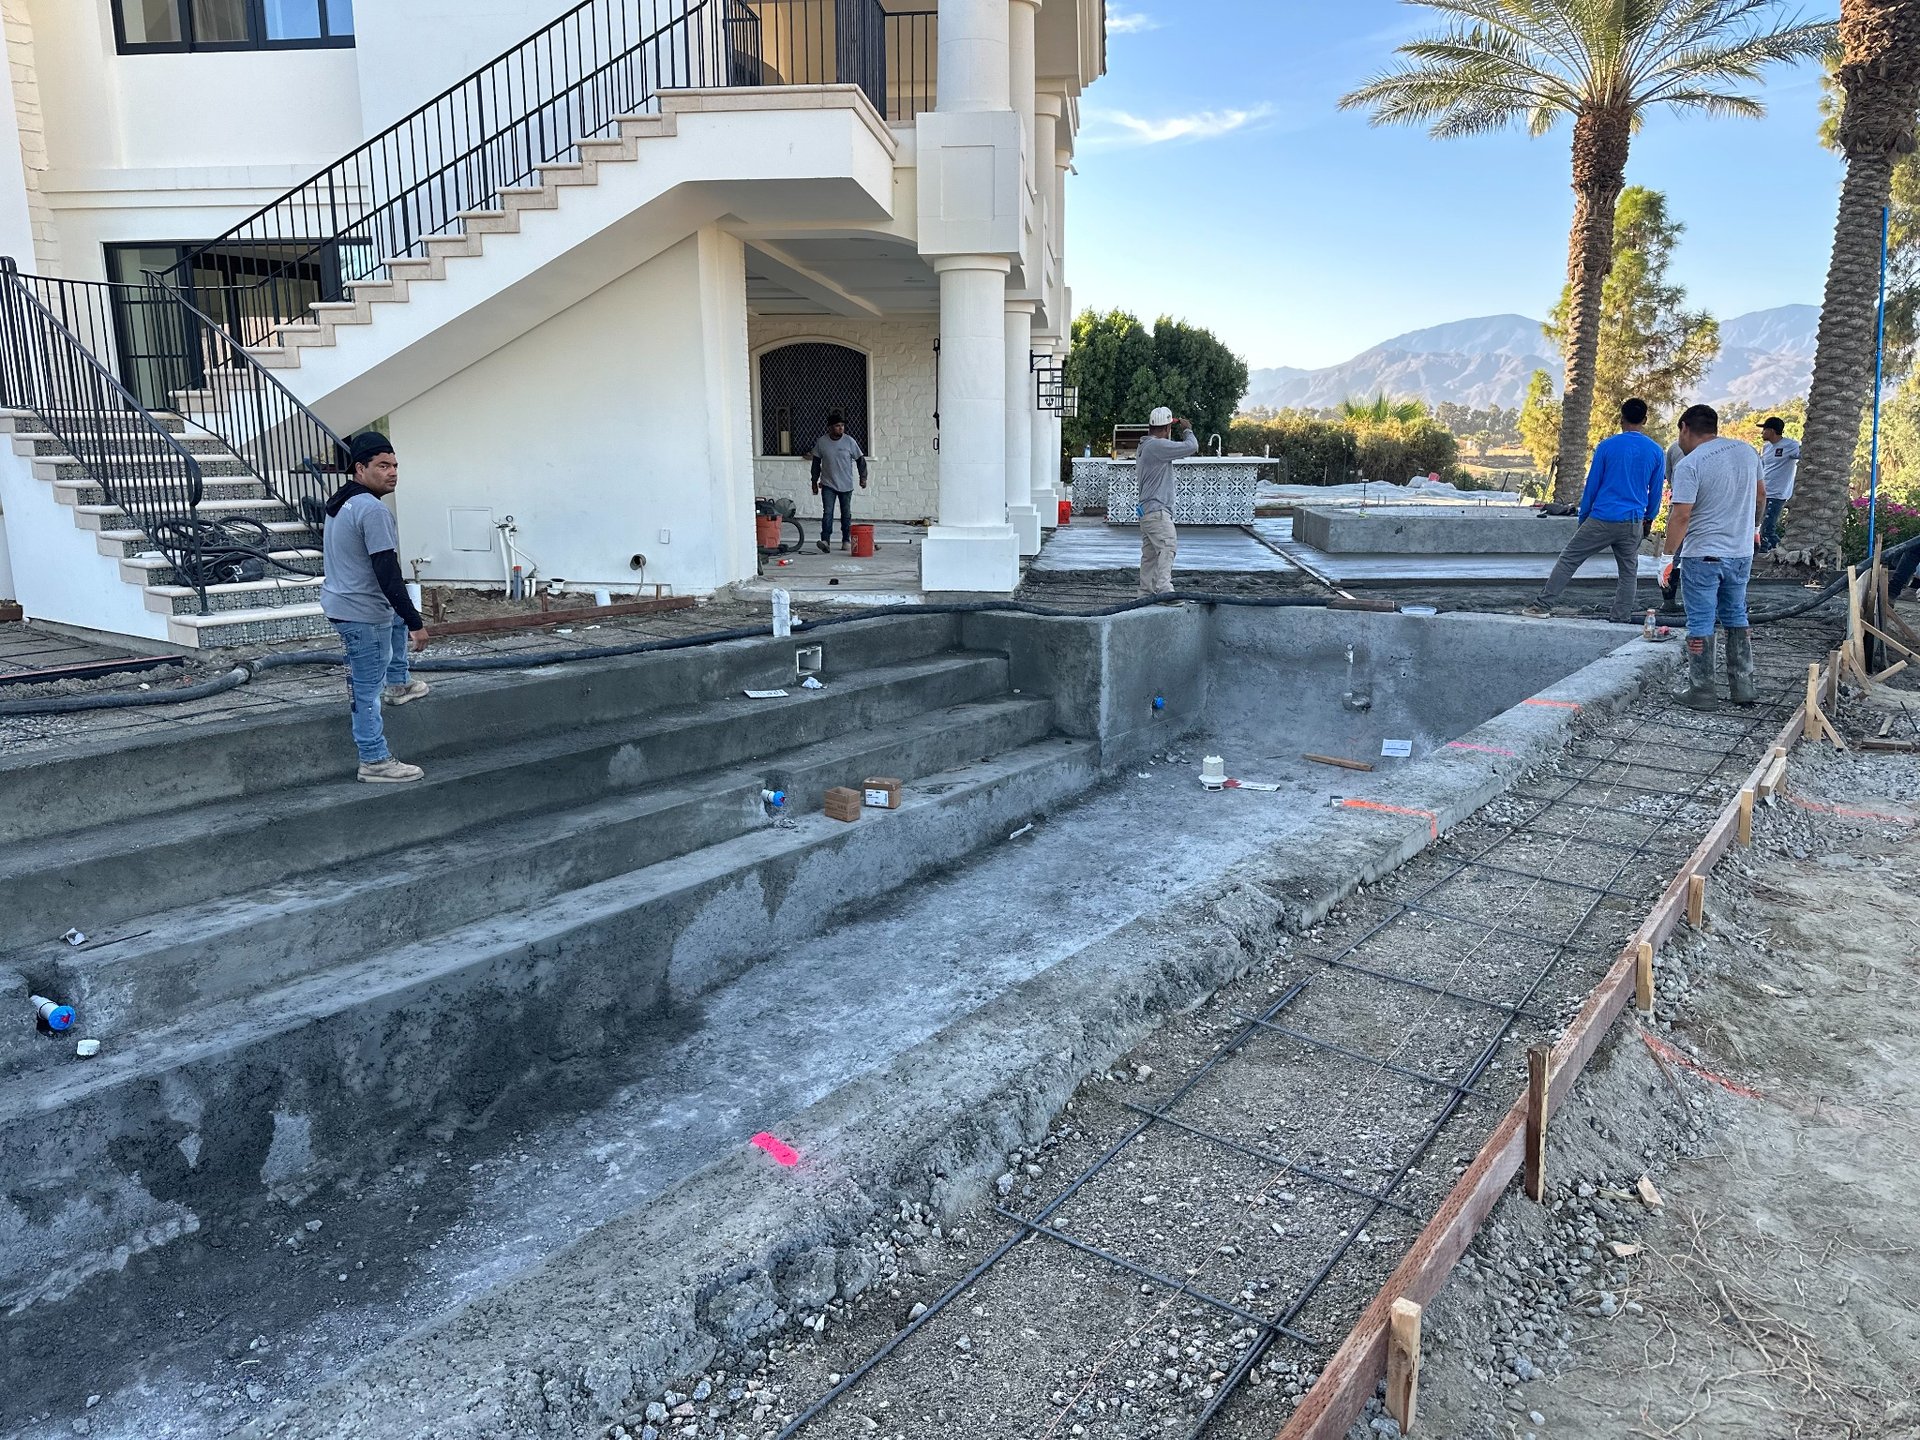
Compare these straight shotcrete steps with the curved entry in the BEFORE photograph. The new lines continue below the waterline, changing the way the pool is entered as well as the way it looks.
Waterproof the details and float the surfaces true
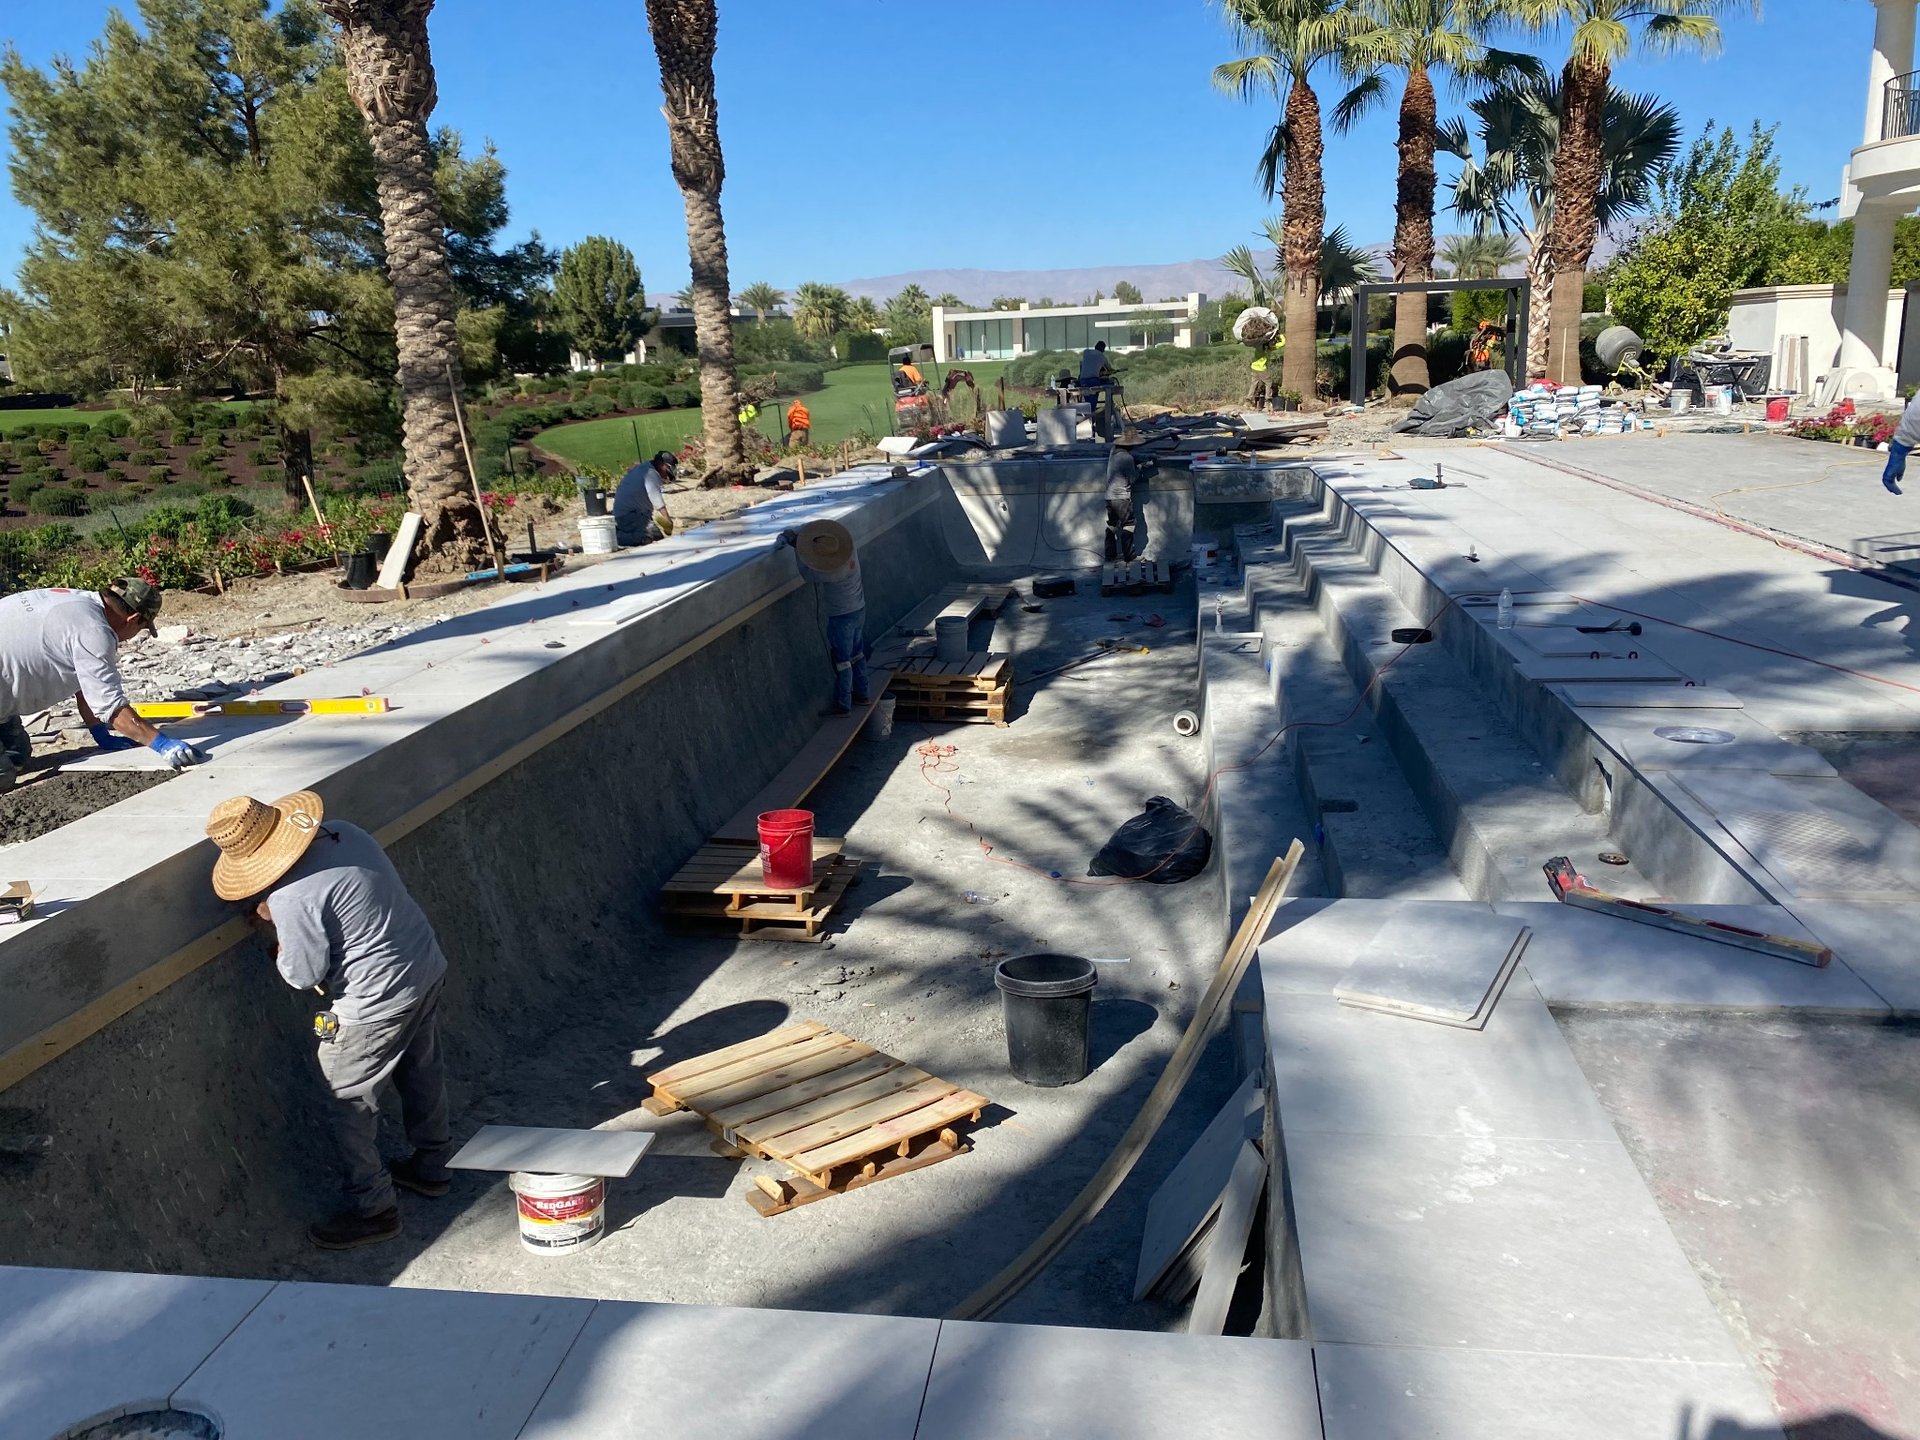
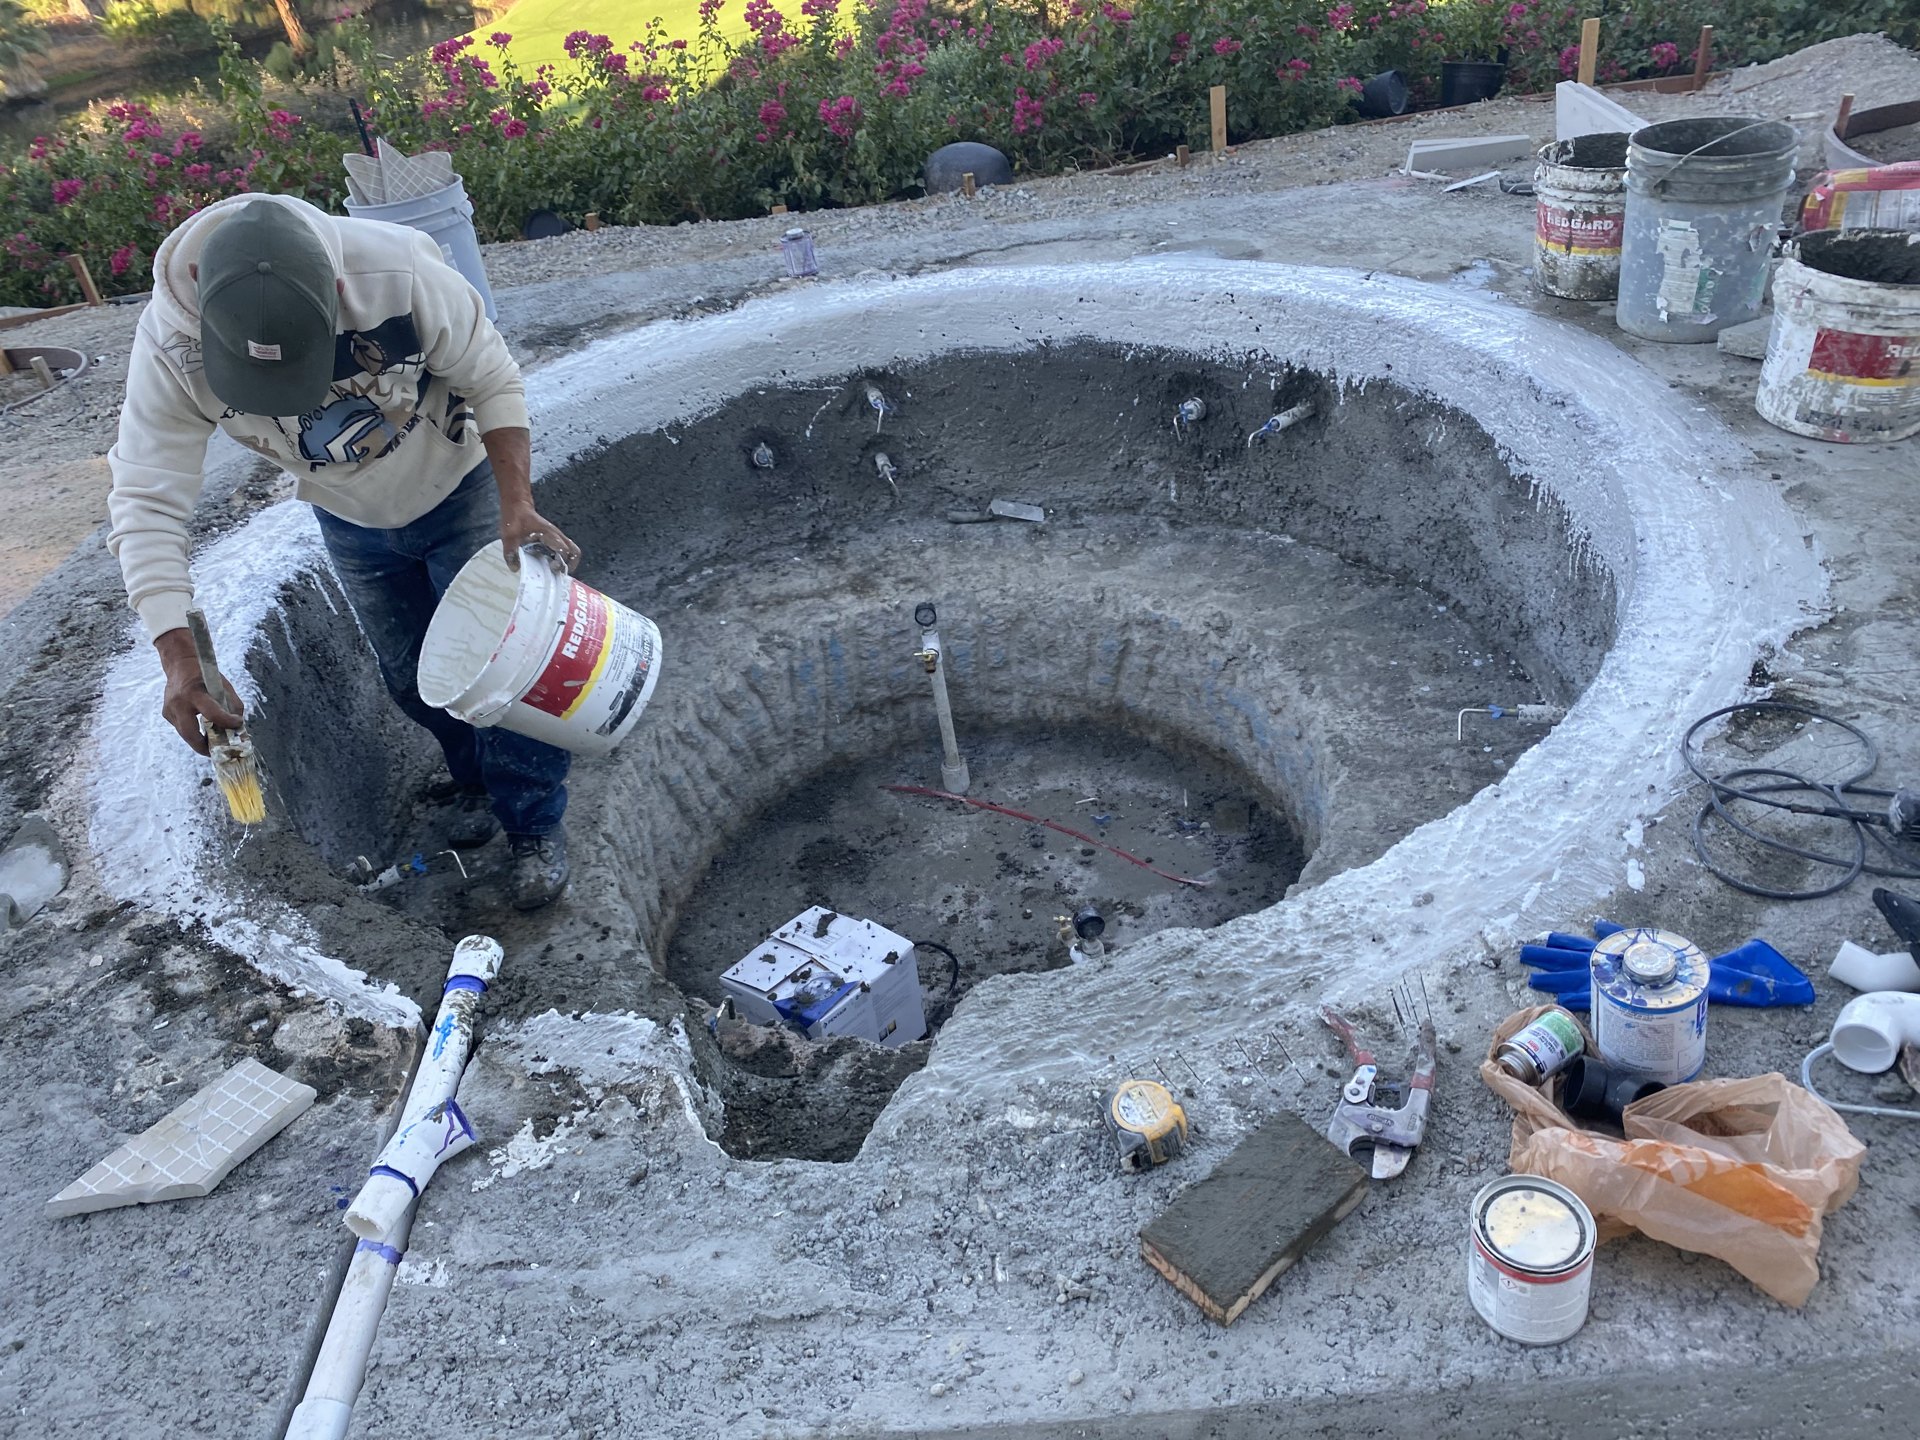
The preparation included LATICRETE HYDRO BAN waterproofing, LATICRETE reinforcing mesh at the specified details and a LATICRETE 3701 mortar float. Each has a job: manage water migration, reinforce designated transitions, and establish true surfaces for the tile. Corners and penetrations deserve the same care as the broad faces.
We use LATICRETE 254 Platinum thin-set mortar for its strong adhesion and suitability for exterior and submerged tile applications. Its workability supports careful bedding and alignment. Waterproofing, mortar and tile need a compatible assembly, with the specified preparation and curing between stages; tiled areas and the plastered pool interior do not automatically use the same system.
Build the deck from the ground up
We prepared and compacted the roadbase before constructing the concrete subbase. These hidden layers support the clean tile surface above and help limit settlement.
Deck elevations, drainage slopes and movement joints must be coordinated with the pool, spa and house. That is why the surrounding yard is part of the pool renovation, rather than an afterthought.
Protect the tile before setting the first piece
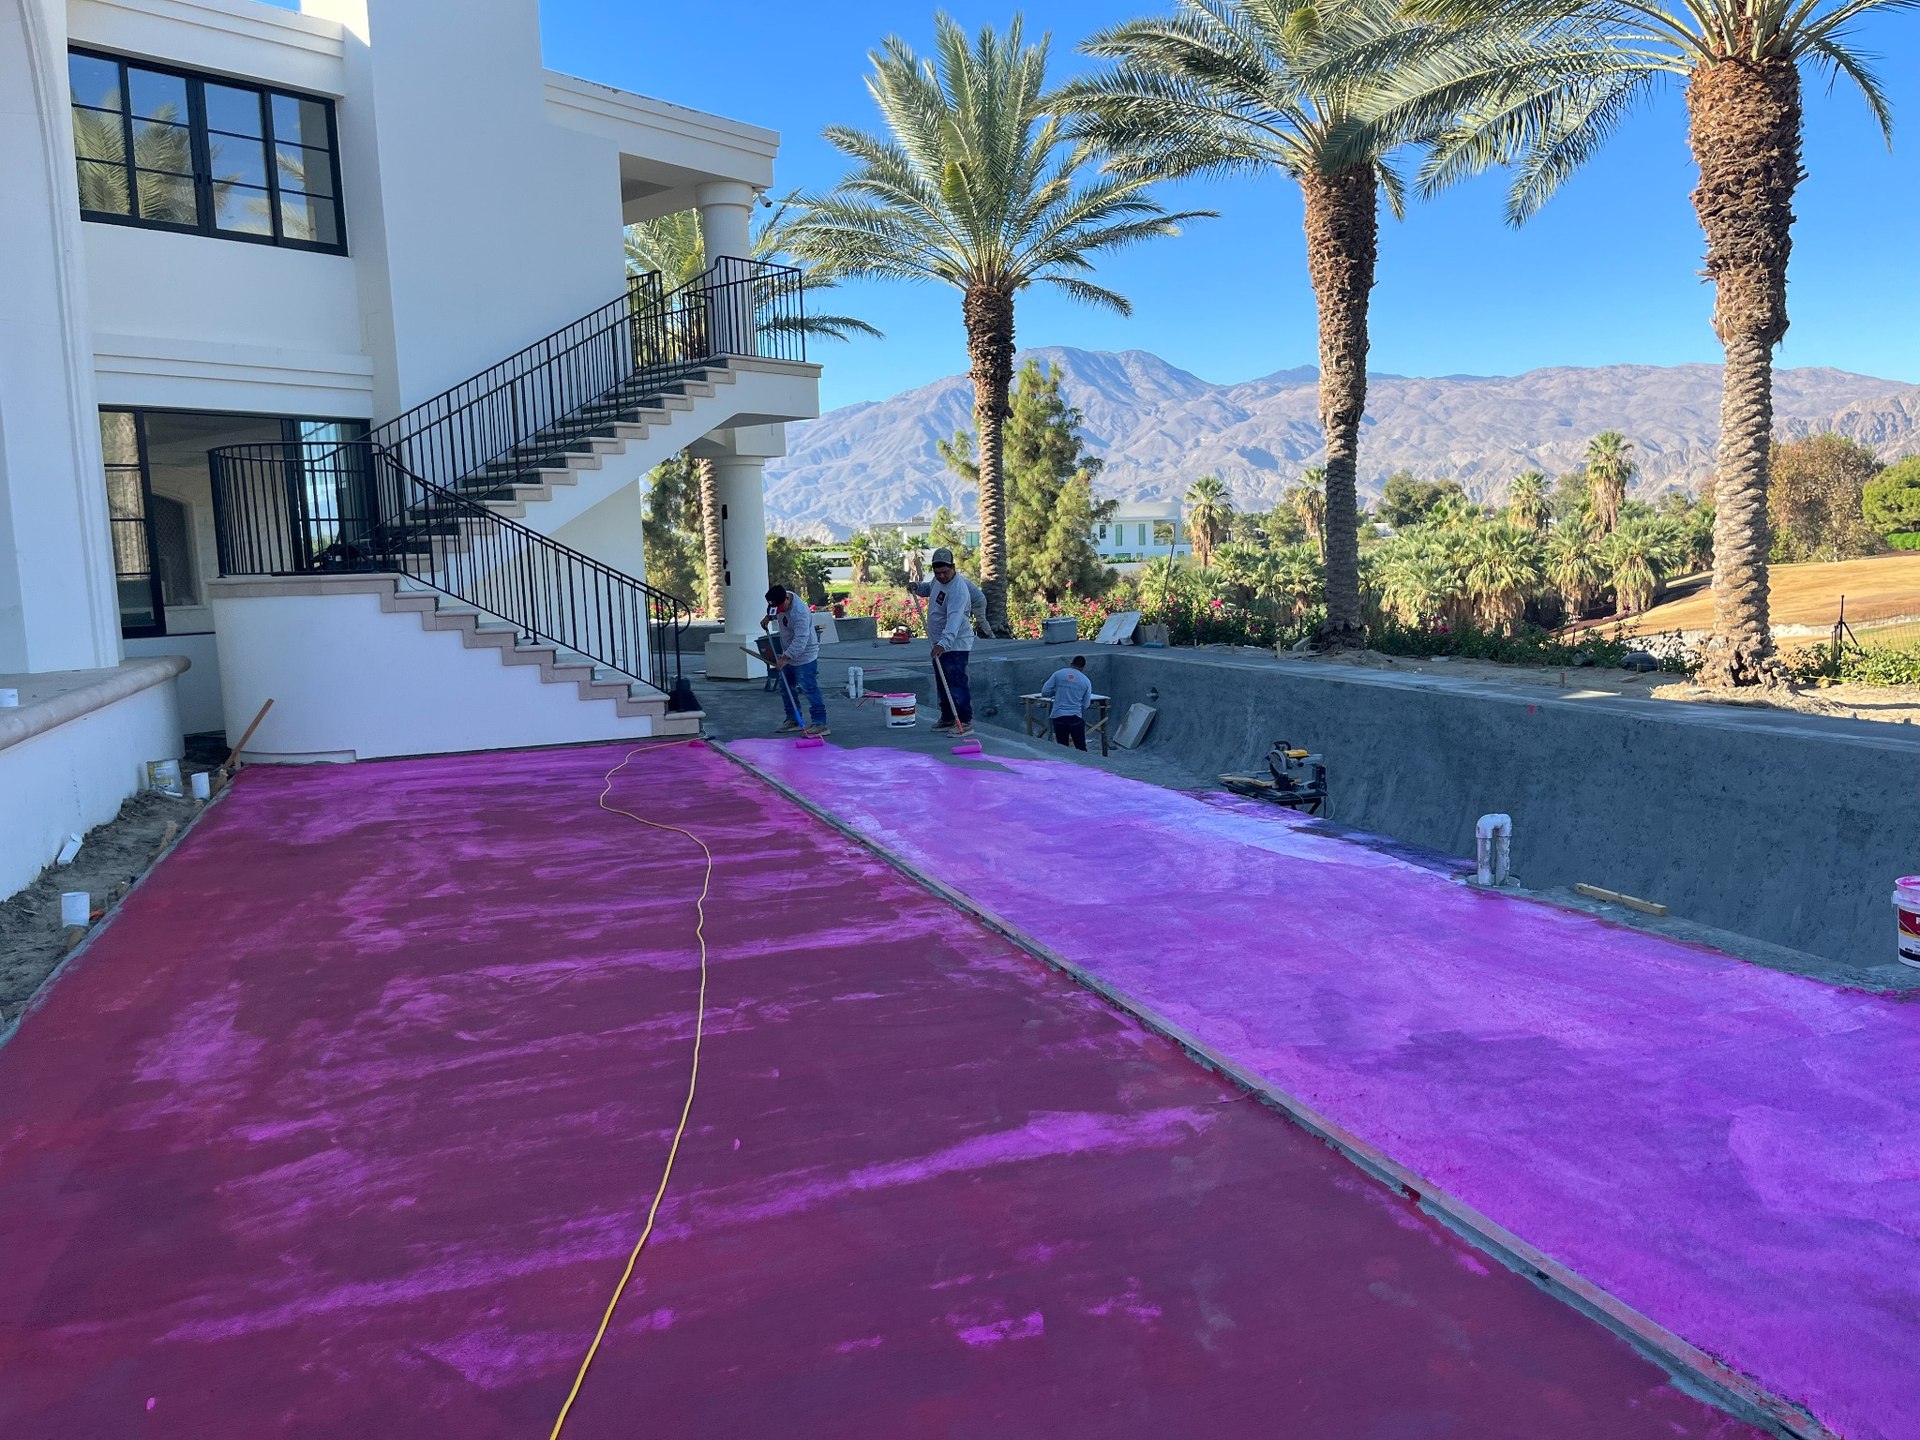
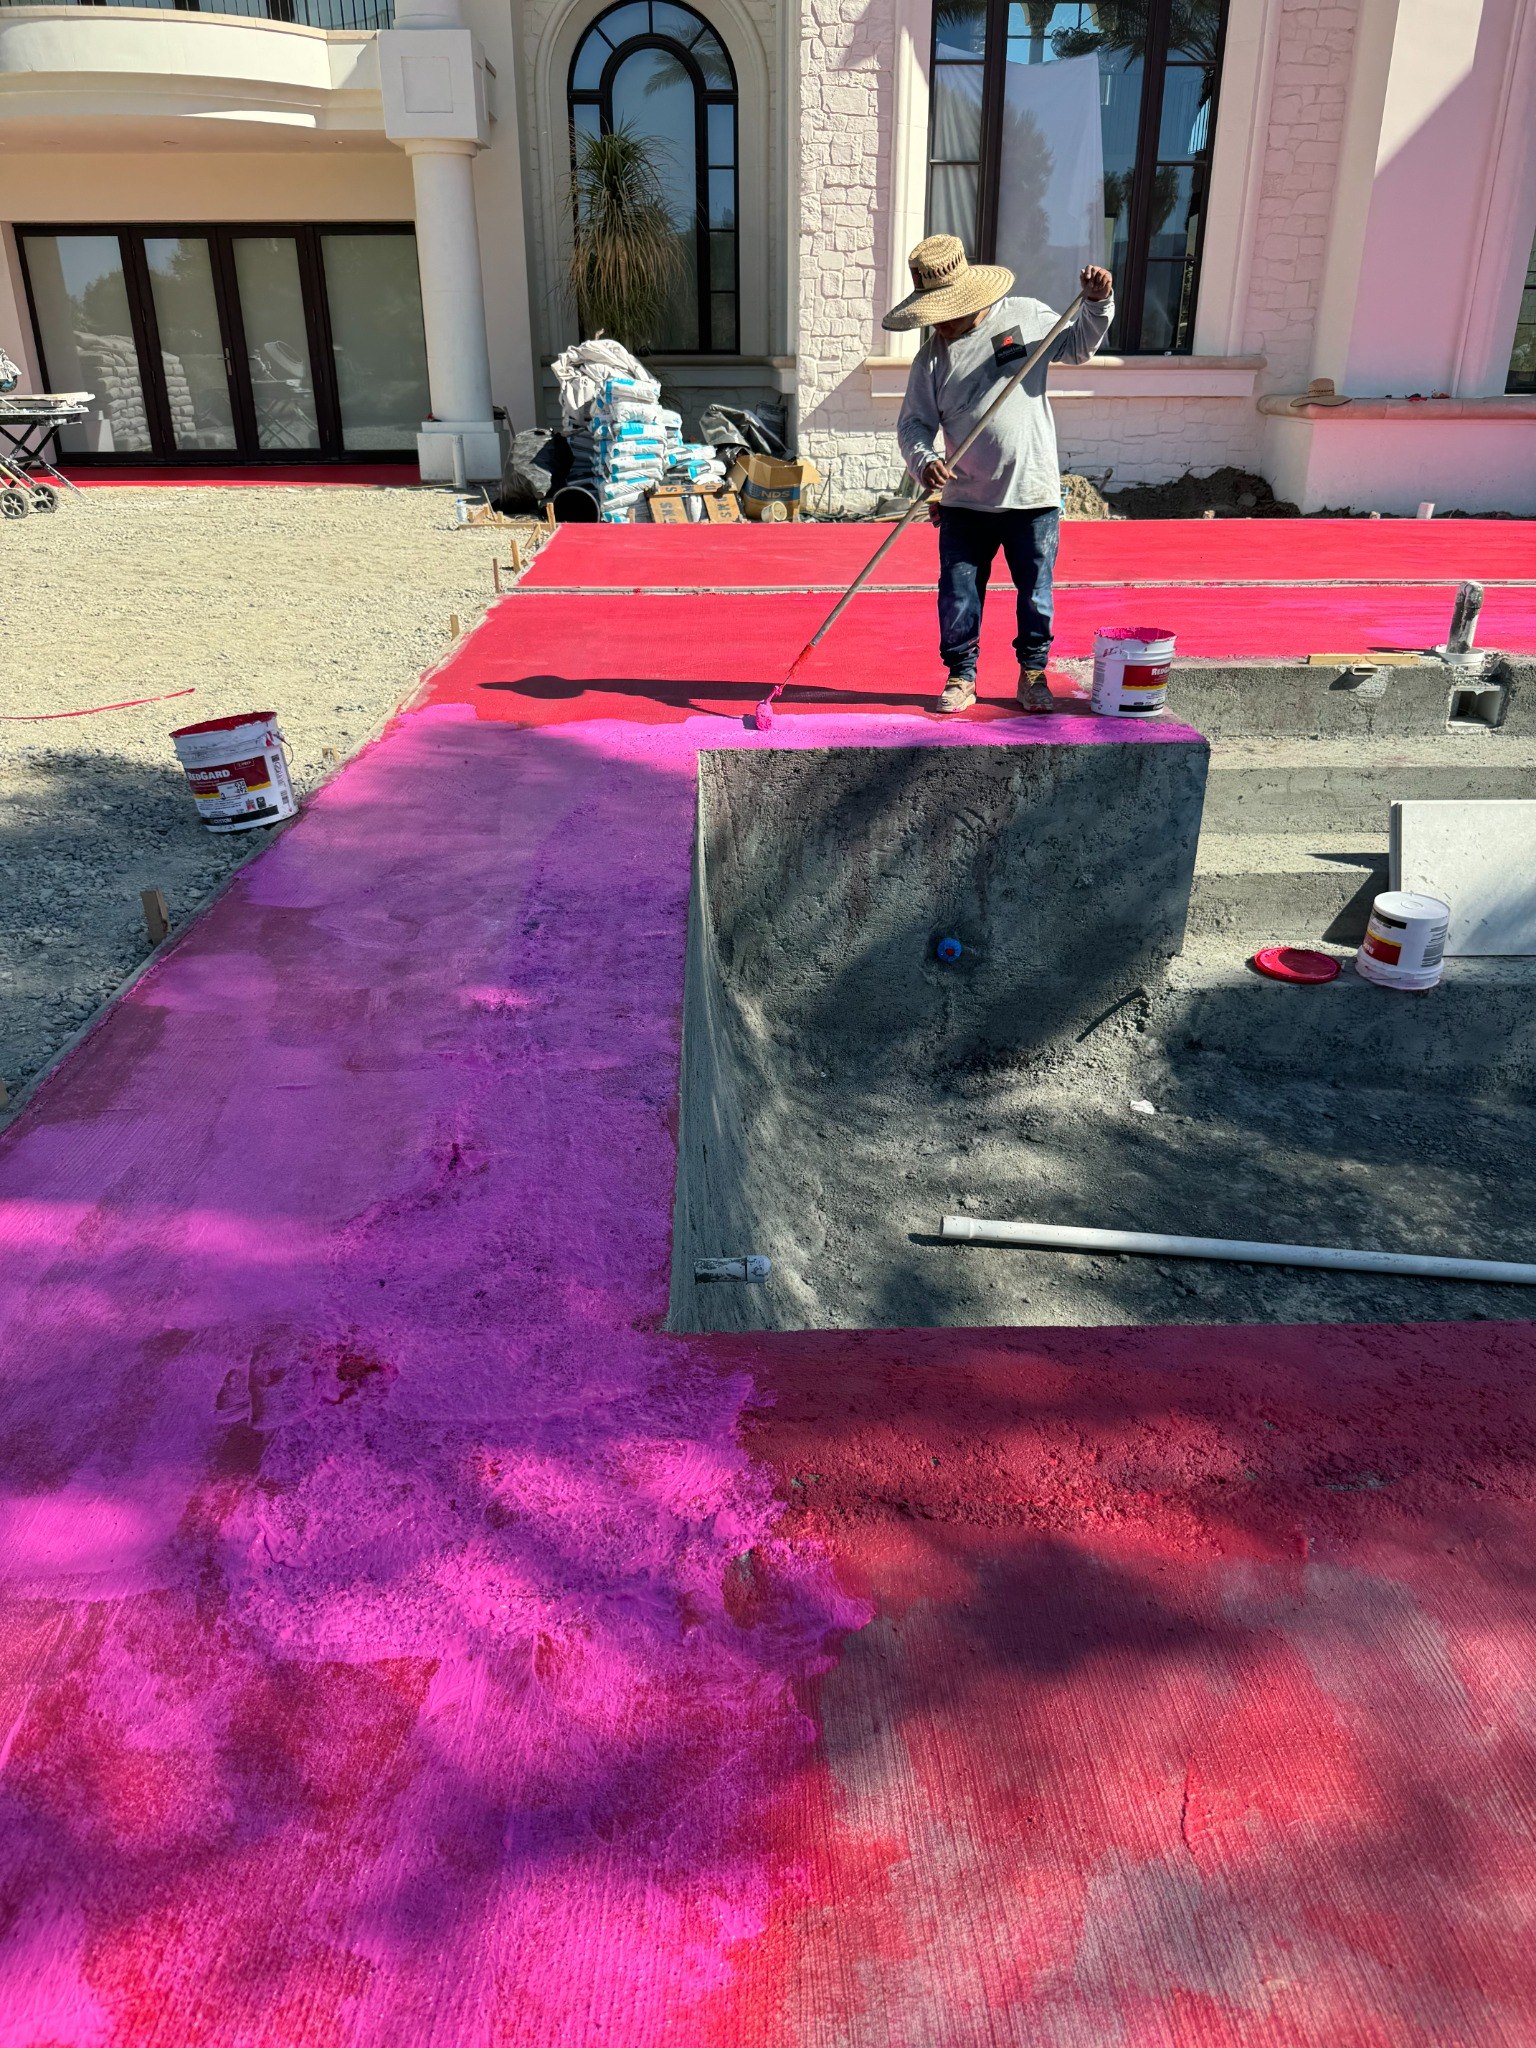
RedGard antifracture membrane was applied over the prepared concrete decking substrate. The photographs show this layer across the deck and along the pool edge, ready for tile.
It helps isolate the finish from limited, nonstructural cracking below. It works alongside a stable base, drainage and properly detailed movement joints; it does not replace them.
Let the tile layout tell the story
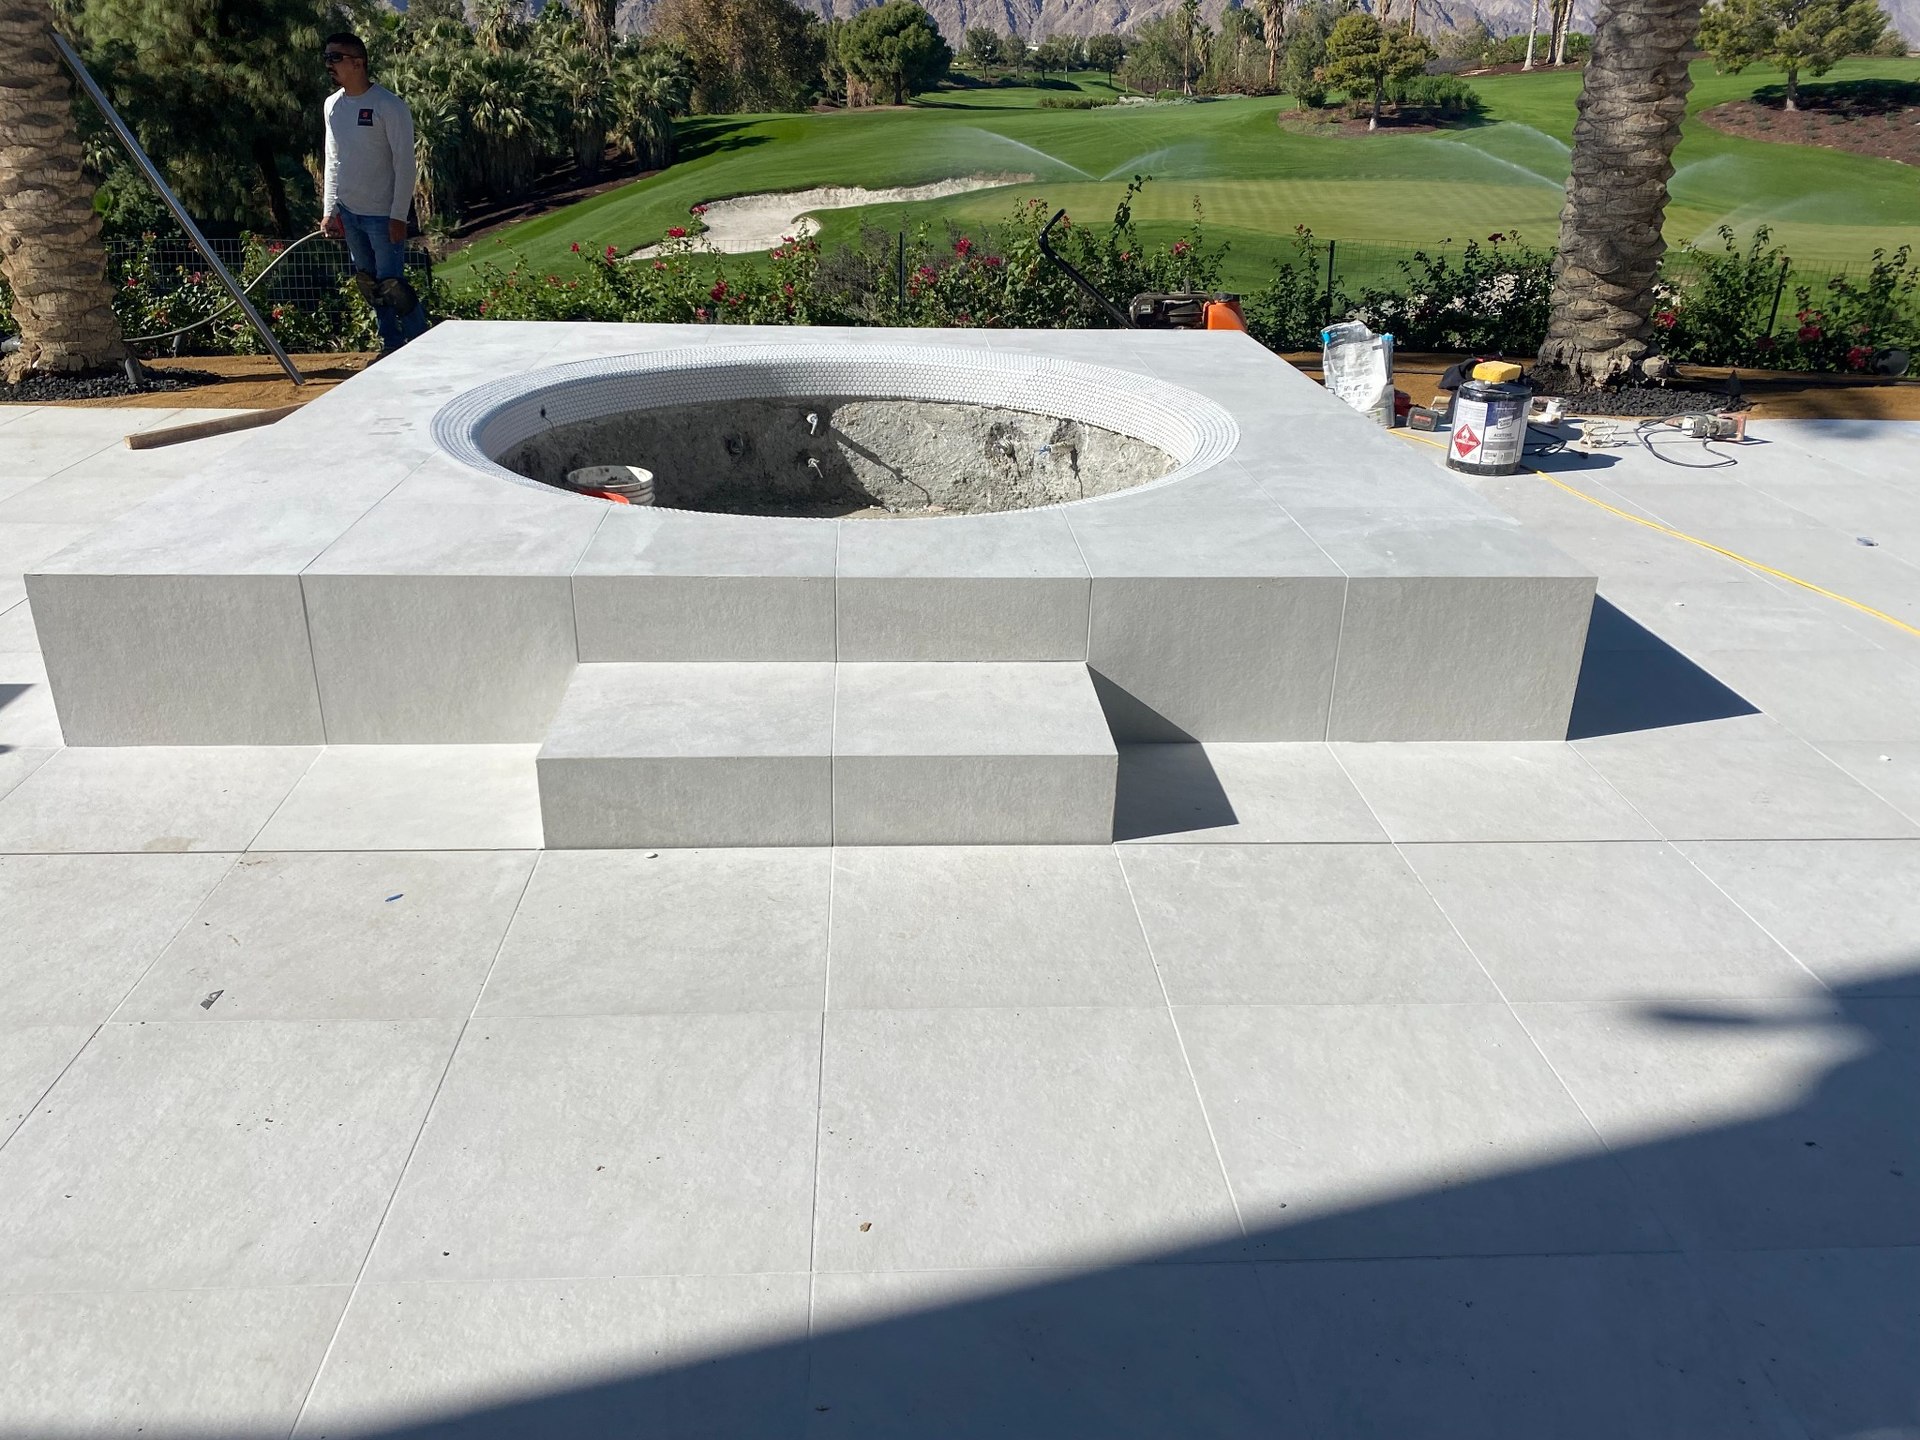
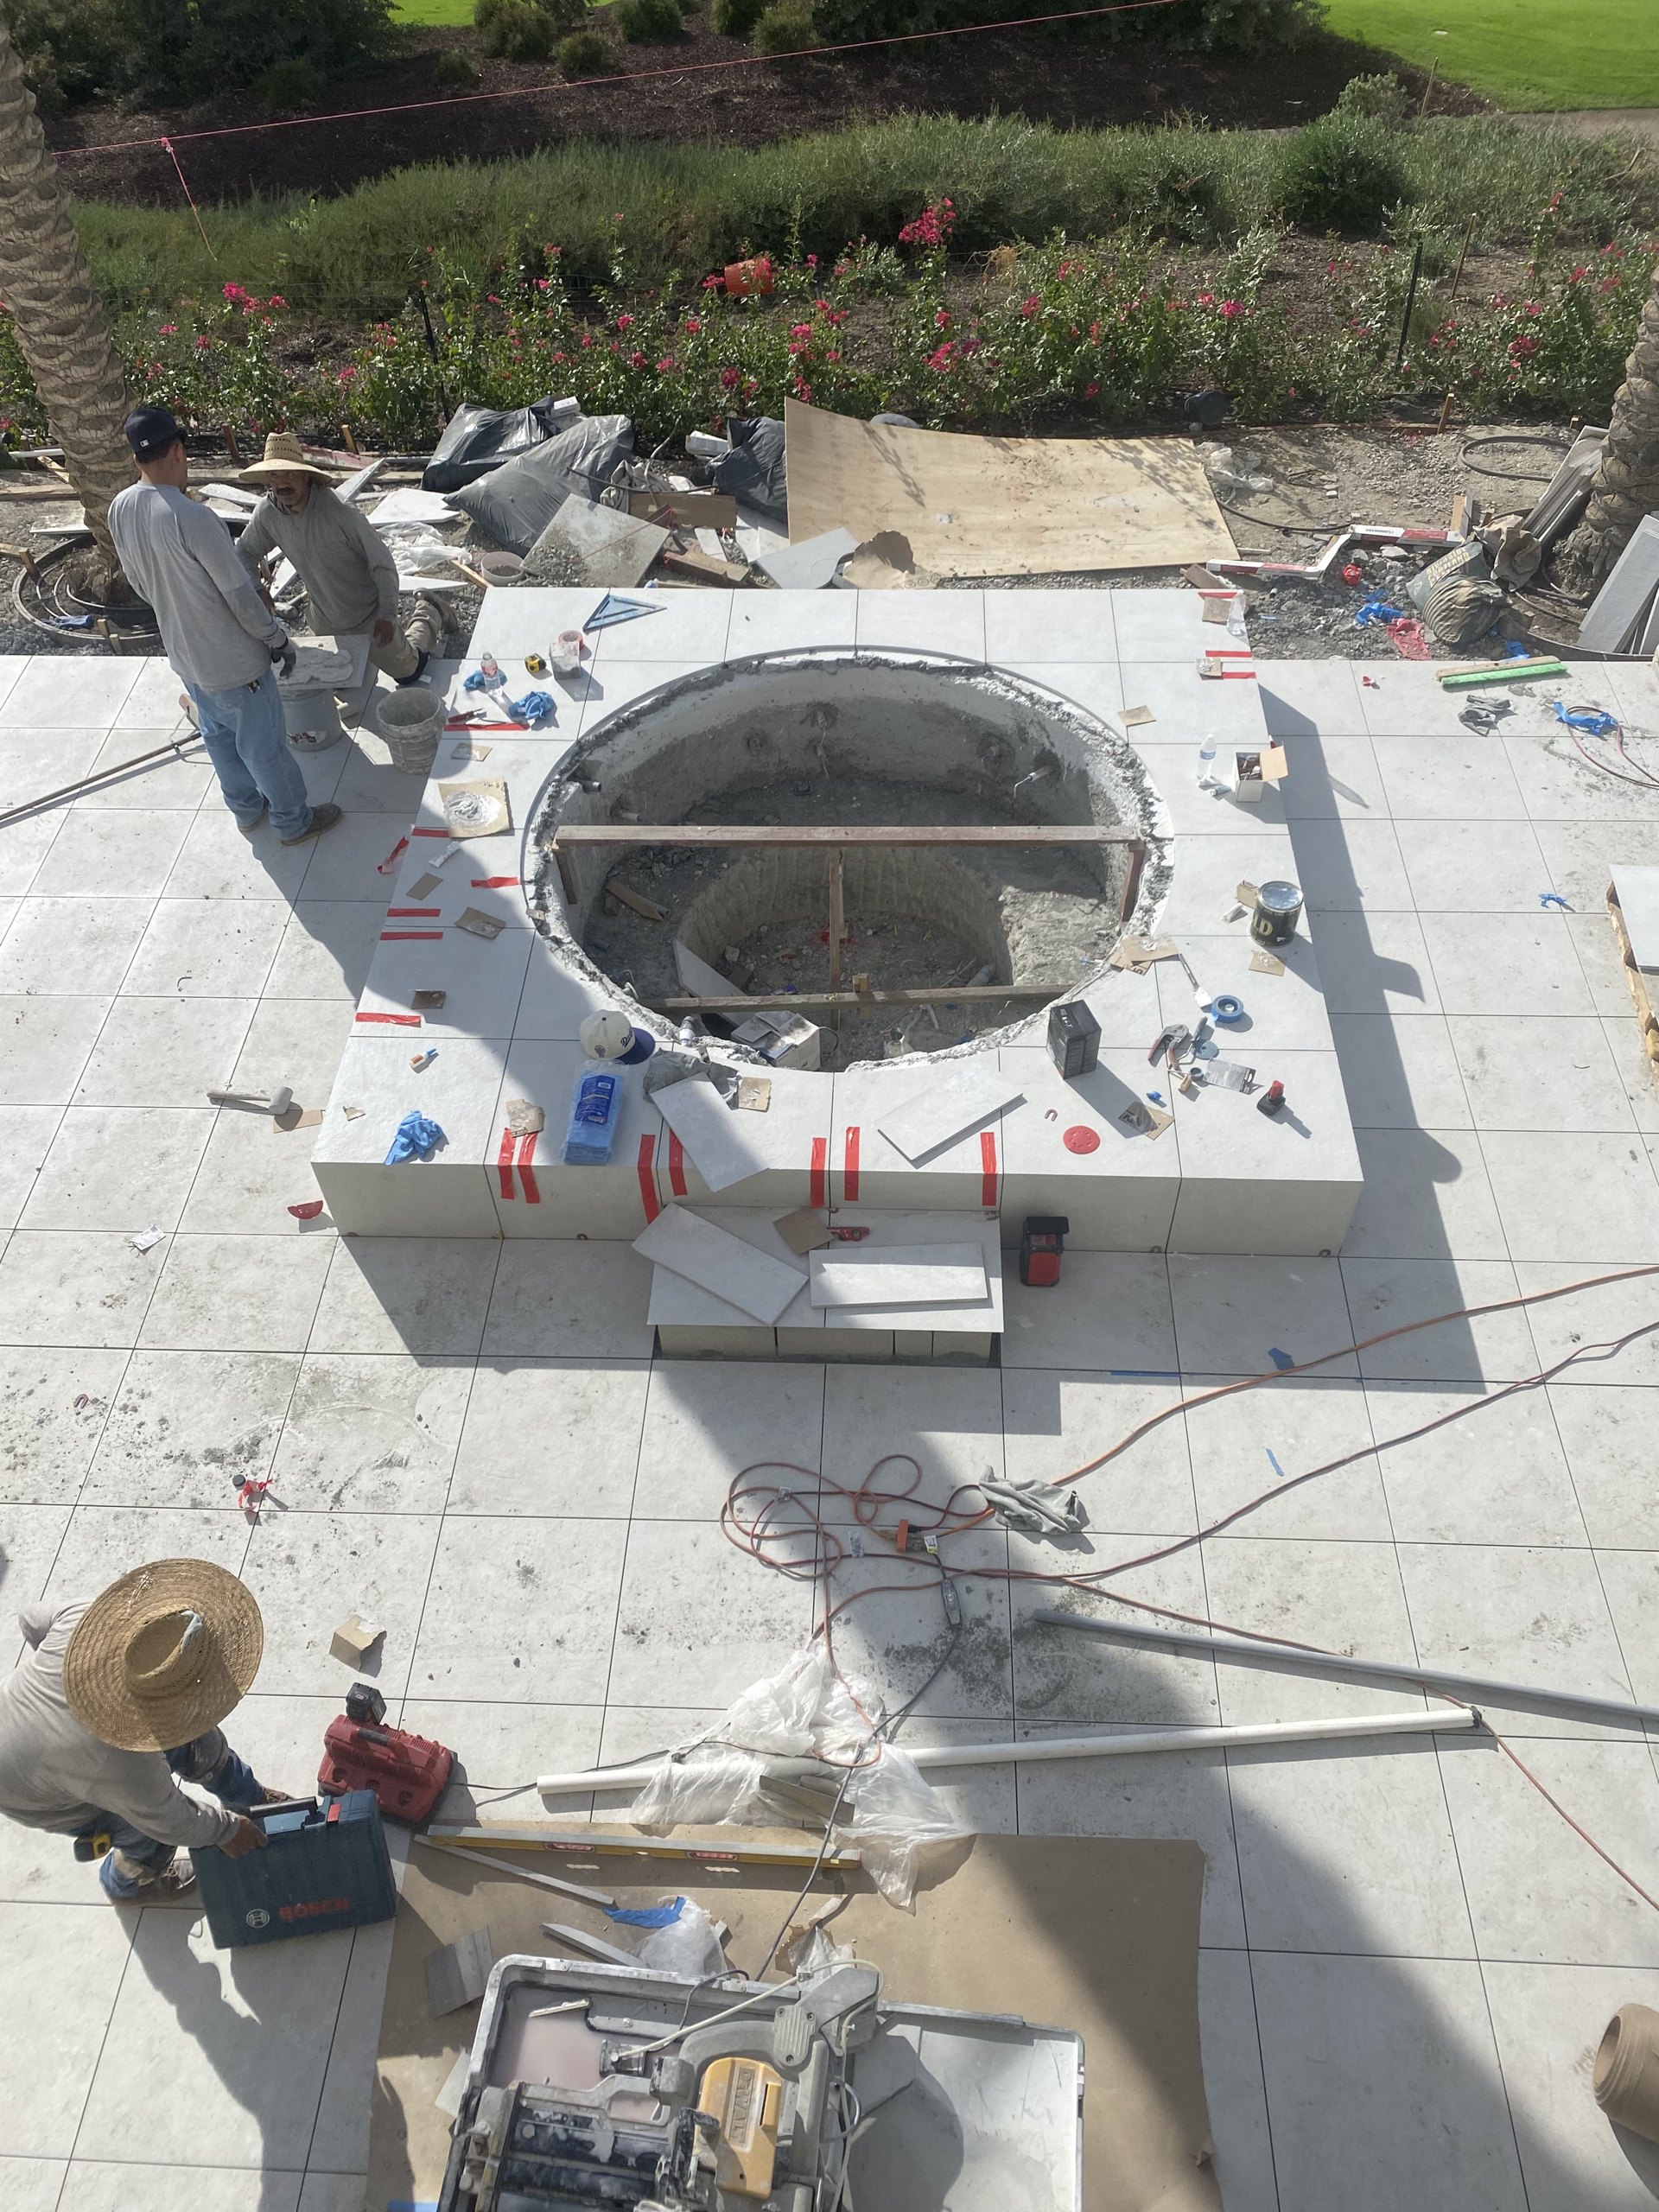
The perimeter was planned around full tile pieces and square pool corners. That required the tile module, pool dimensions, wall positions and mortar float to agree before setting began. Necessary cuts were resolved at transitions and special details.
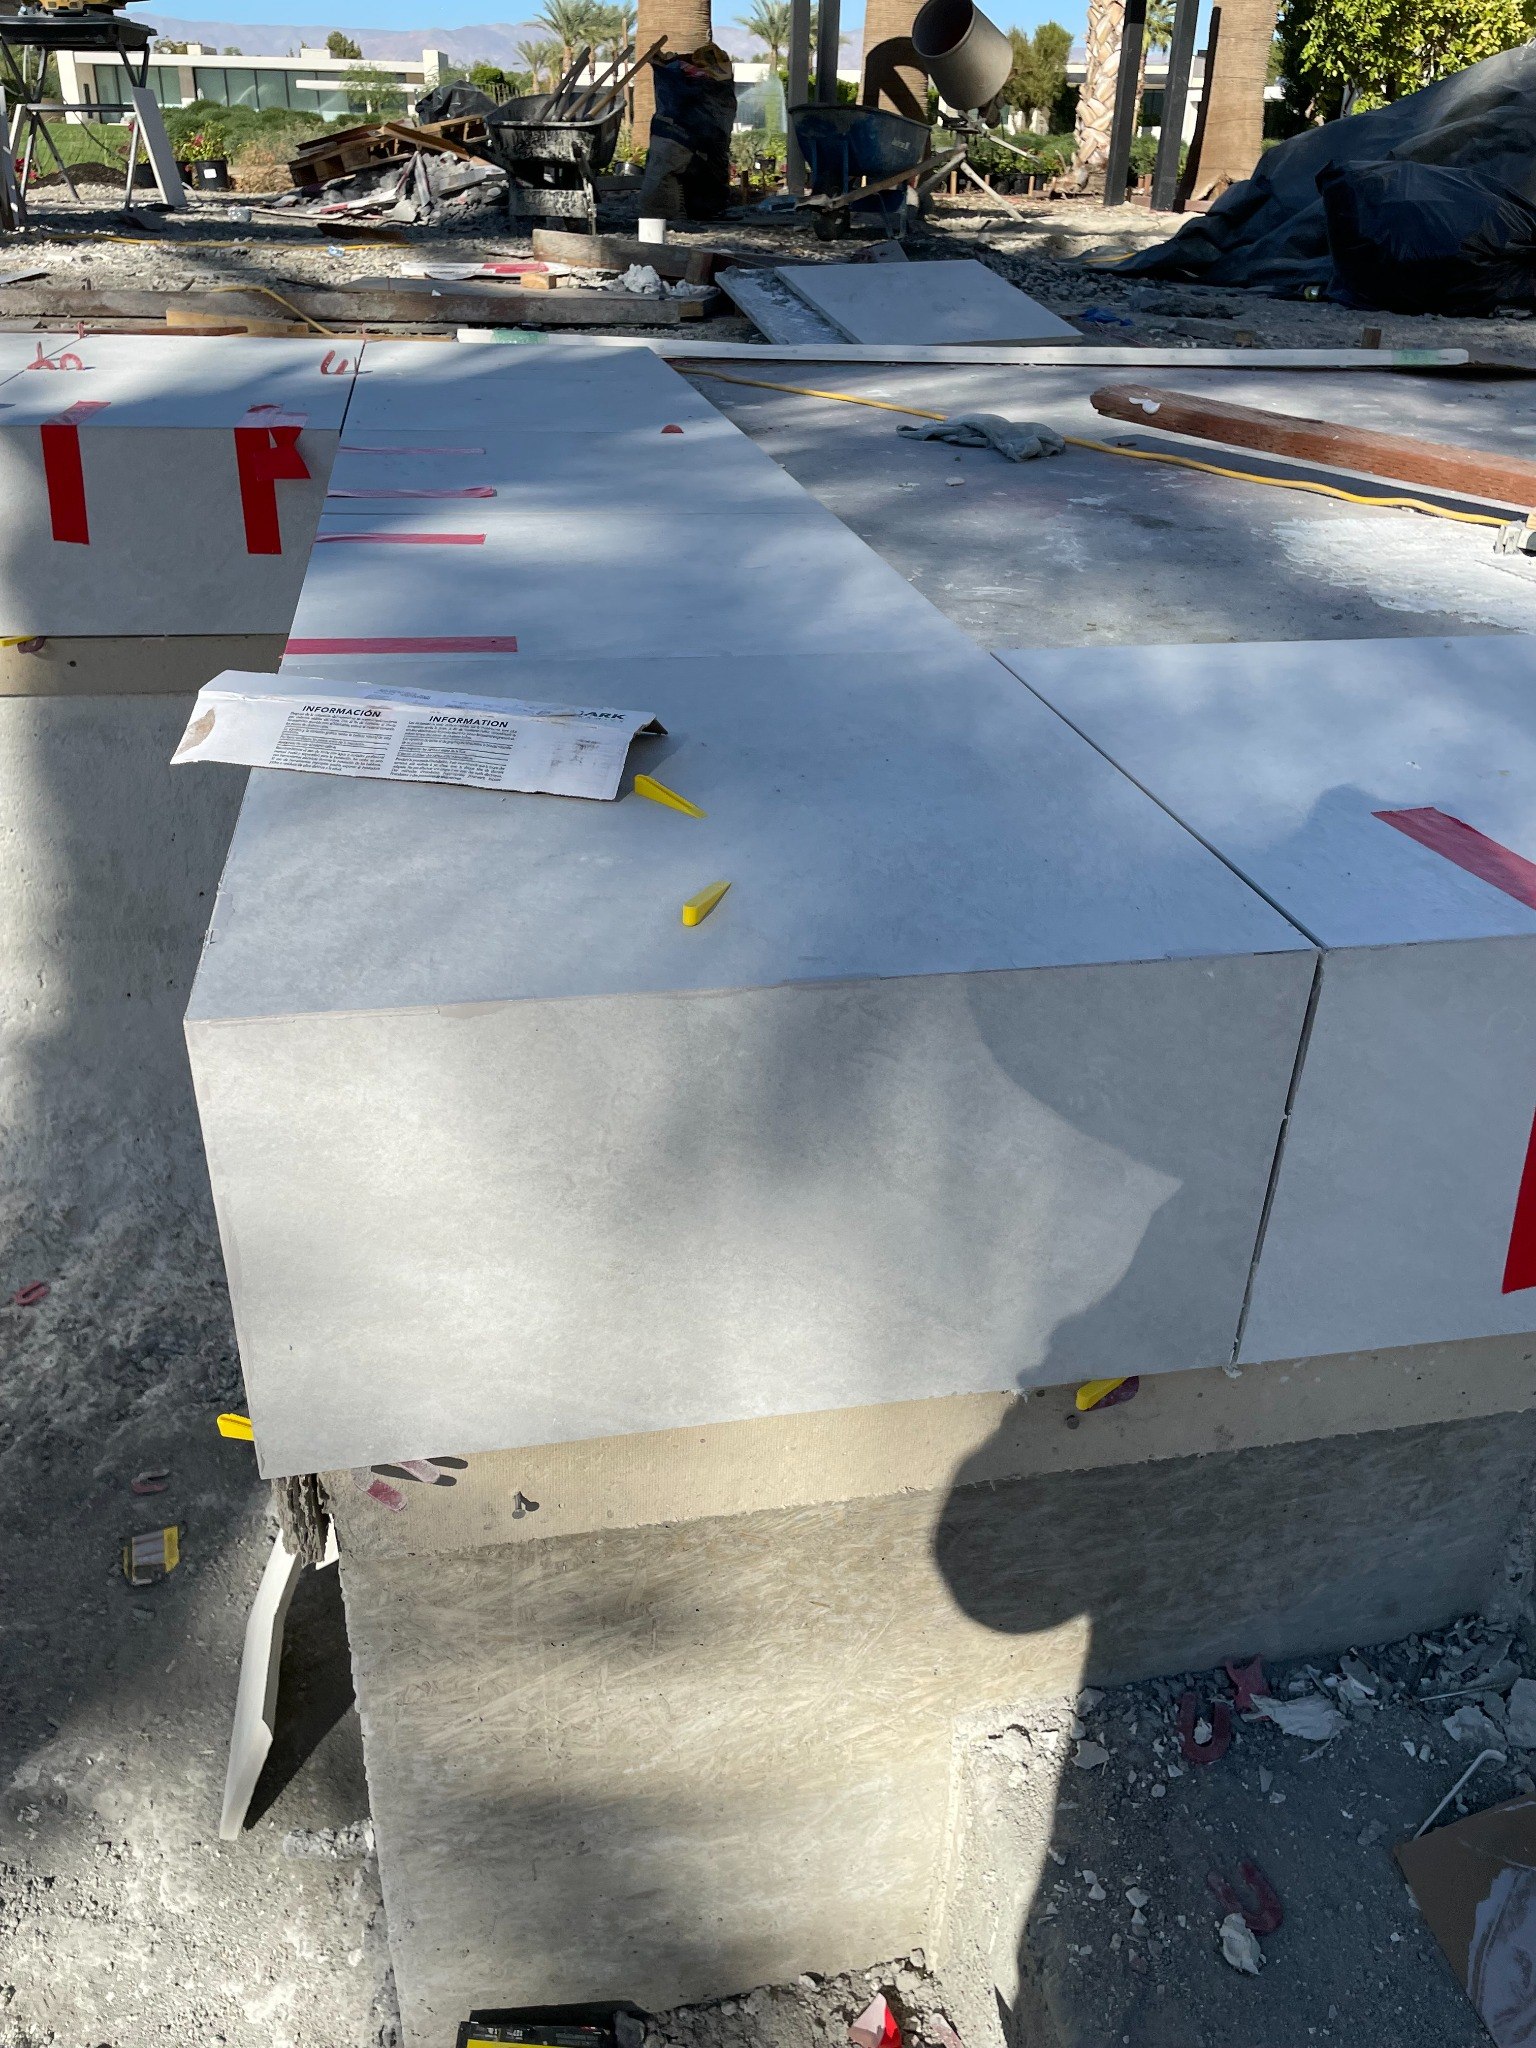
The same planning carries into the spa and raised seating pedestals. Deck joints continue up vertical faces and across top surfaces. Those lines make separate elements feel like one design—and reveal how accurately the work beneath the tile was built.
Precision in the details
Follow one joint. See the planning.
Follow the deck joint toward the spa: through the step, up the face and across the cap. The close-up shows the same care where horizontal and vertical tile surfaces meet. This continuity starts with layout, long before grout makes the joints visible.
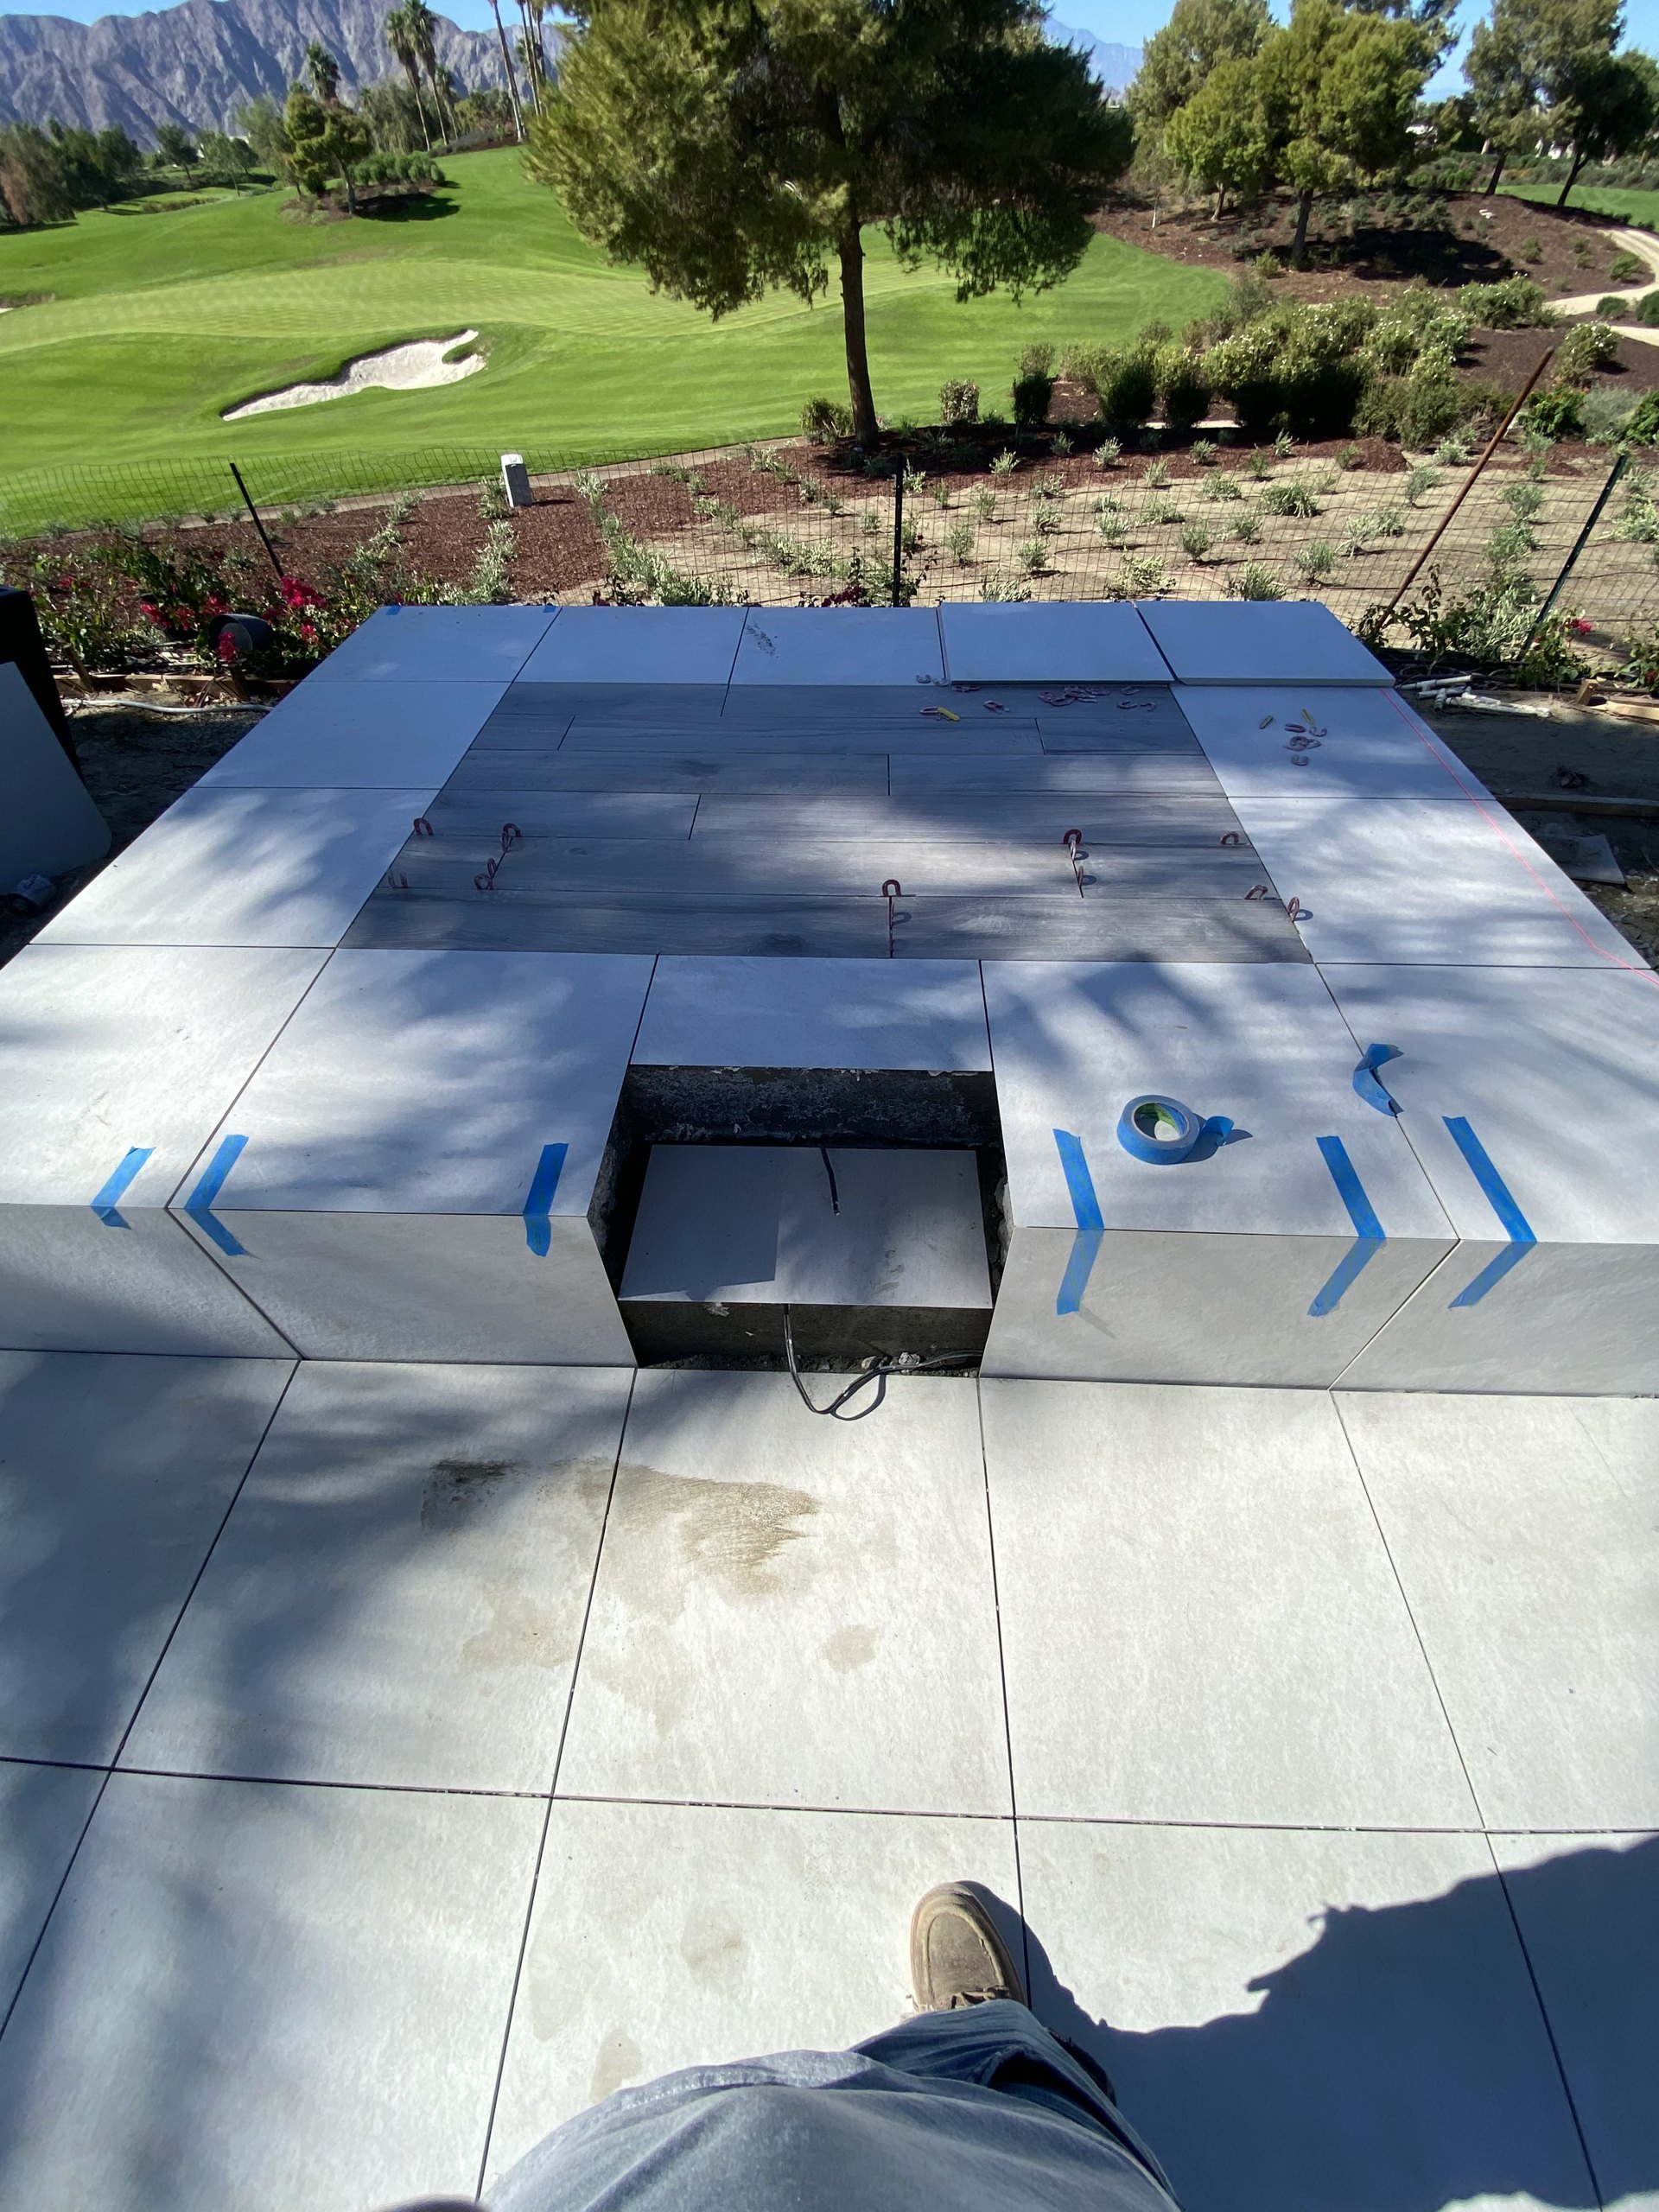
Precision tilework
Follow the joints from deck to spa
Full clip · 40 seconds
The walkthrough follows the deck tile grid to the spa step, vertical face and cap, then along the rectangular pool edge. Pool and spa interiors are still unfinished.
What this video shows
The full walkthrough begins on the tiled terrace, approaches the spa, and follows deck joints through the spa step and up its squared surround. It circles the spa and turns back toward the house before following the new rectangular pool edge and its long linear steps. Tools, a blue tarp and unfinished interiors remain visible throughout the later views.
Prepare for the pebble plaster finish
The interior finishing scope included Bond Kote surface preparation followed by pebble plaster. Bond Kote provides a bonding surface for the pool finish on the appropriate prepared substrate; pebble plaster supplies the interior's final color and texture.
This finishing work follows the heavy construction and surrounding finish operations that could damage the interior. The prepared shell is ready for its final surface, with the straight steps and rectangular edges already established.
Bring the pool to life, then hand it over
A shape-changing renovation is not complete when the plaster crew leaves. Filling and startup must follow the selected finish manufacturer’s instructions, including the required water testing, balancing and brushing. The new finish needs that care as it settles into service.
A complete handover includes checking circulation, filtration, spa operation and lighting, addressing the final punch list, completing required final inspections, and explaining controls and ongoing care to the homeowner. The goal is a pool that works as thoughtfully as it looks.
The result
A new chapter for the same backyard.
AFTER — COMPLETED POOL & SPA
The finished transformation
Full clip · 24 seconds
AFTER — The completed Madison Club pool and spa, with water in the pool, the spa operating, and the finished tile deck and raised seating in place.
What this video shows
An elevated walkthrough opens above the completed spa and tiled terrace. The camera pans past the landscaped edge and across the filled rectangular pool, showing the straight perimeter, coordinated deck tile and raised seating pedestals, then finishes over the adjacent lounge area.
The finished pool makes the idea tangible: a new rectangular outline, an operating spa and tile lines that connect the whole terrace. Suitable parts of the original pool remain within a setting that now has a different character.
What would you change about your pool? →What would you change?
The pool you have may hold the beginning of the pool you want.
Depending on your property, possibilities include:
Existing conditions, structure, hydraulics, access and applicable approvals determine which changes are practical for your property.
Begin with a complimentary site visit
Love your home. Rethink your pool.
If the shape, size or depth of your pool no longer works for you, start with a conversation about what could change and what may be worth keeping. Tell us your project city and what you would like to do. We will evaluate the property and prepare a complimentary detailed scope and budget.
Richard Lusk Landscape and Design, Inc.
C-27 Landscaping · C-53 Swimming Pool
California license #950714
Serving Orange County, selected Los Angeles communities and La Quinta.
Request a Complimentary Site Visit
A site visit, detailed scope and budget. No cost and no obligation.
Tell us how to reach you and where you plan to build. Our team will follow up to arrange your visit.
Materials and construction references
Product and construction references explain the process considerations discussed here. Requirements, assemblies and startup instructions are selected for each project and its actual materials.
- LATICRETE HYDRO BAN product information ↗
- LATICRETE 3701 Fortified Mortar Bed ↗
- LATICRETE 254 Platinum thin-set mortar ↗
- RedGard waterproofing and crack prevention data ↗
- SGM Bond Kote ↗
- CPSC pool electrical safety ↗
- La Quinta: obtaining a building permit ↗
- La Quinta: scheduling inspections ↗
- American Shotcrete Association: concrete interfaces and surface preparation ↗
- American Shotcrete Association: curing swimming pool shotcrete ↗
- Pool finish care and startup: manufacturer guidance example ↗